


Xenoarcheology: Difference between revisions
From Space Station 14 Wiki
Added the permanent artifact utility section |
{{u}} |
||
| (32 intermediate revisions by 3 users not shown) | |||
| Line 1: | Line 1: | ||
Xenoarcheology is a | '''Xenoarcheology''' (aka ''Xeno'') is a branch of [[Research and Development|R&D]], providing a method of [[Science#Point Generation|point generation]] utilizing randomly generated '''artifacts'''. It is the job of [[Scientist|scientists]] to discover and activate the secrets of these artifacts. | ||
== Artifacts == | |||
[[File:Xeno_artifacts.png|border|center|896x896px]] | |||
Artifacts are mysterious objects Science can study and experiment on, unlocking their potential in variety of effects, whilst generating points to advance research. Their appearance varies, size included. | |||
One or few artifacts are usually available round-start in «xeno» part of Science. More can be bought at [[Cargo]] for {{Spesos|2000}} a piece, found by [[Salvage]], found from a [[Bluespace Artifact station event]] or assembled from [[User:Aliser/Xeno 2.0#Artifact Crusher|artifact fragments]]. | |||
Each artifact has a set of «nodes» — each is an '''effect''' that can be activated via a corresponding '''trigger''' (or triggers). Nodes are assembled into a tree-like structure, with distinct layers. Each layer inherits previous layer's triggers, while acquiring one or few new ones. This means that for more in-depth nodes it is gradually harder to activate them. Point output also scales with depth. | |||
For each activation attempt, a time window of 5 seconds is given to activate any trigger. Once a trigger is activated, 5 seconds added to the clock. This happens for each activated trigger, meaning the more triggers a node has, the wider the activation window. | |||
Once a node is unlocked, its effect is activated and it becomes '''active'''. An active node cannot be activated again via its triggers, but it ''can'' be activated manually. By left-clicking an artifact (or pressing {{Key|Z}} while holding one), all ''active'' nodes activate '''all on once''', consuming one '''durability''' in each node. Once durability of a node is depleted, it can no longer be activated (not by triggers nor manually). Unlocking next in-depth connected node will lock the current node, even it has more durability left. | |||
Unlocking all nodes of an artifact currently has no reward, but you still get points from each node. | |||
== Equipment == | == Equipment == | ||
To start experimentation only two pieces of equipment are needed: '''Analysis Console''' and '''Artifact Analyzer'''. | |||
=== Analysis Console === | === Analysis Console === | ||
[[File: | [[File:Analysis_Console.png|84x84px]] | ||
'''Analysis console''' is the main method of getting information about the artifacts that are being researched. In order to properly use it, it must be linked to an [[User:Aliser/Xeno 2.0#Artifact analyzer|artifact analyzer]] via {{Item|multitool}} as well as have a research server selected (usually already selected). | |||
From the console itself, the screen displays information about an artifact laying on top of linked '''Artifact Analyzer'''. | |||
[[File:Xeno Analysis Console UI.png|frameless|750px|class=smooth-render]] | |||
Left side of the window displays information about the currently selected node. Right side is the tree-like representation of all the nodes inside an artifact, starting from the bottom going up. | |||
To view information about a node, click on it. To get the full picture (effects and triggers), all of the predecessor nodes must be unlocked first. | |||
{| class="wikitable" | {| class="wikitable" | ||
|+Analysis Console Interface | |||
!Element | |||
!Description | |||
|- | |||
|ID | |||
|Unique node identificator. Useful for the [[User:Aliser/Xeno 2.0#Node scanner|node scanner]]. | |||
|- | |- | ||
|Class | |||
|Layer name. Nodes on the same layer (horizontally) share the same layer name. | |||
|- | |||
|Status | |||
|Node status: | |||
* {{Colored text|red|Locked}} initially. | |||
* {{Colored text|pink|Active}} when first activated. | |||
* {{Colored text|green|Unlocked}} when a more in-depth connected node is unlocked (blocking manual activations). | |||
|- | |- | ||
| | |Durability | ||
|Amount of available manual activations once a node is unlocked. | |||
|- | |- | ||
| | |Effect | ||
|Effect that will happen once a node is activated or with every manual activation. | |||
|- | |- | ||
| | |Triggers | ||
|Triggers needed to activate a node for the first time. | |||
|- | |- | ||
| | |{{Button|Server}} | ||
| | |Allows to choose a server to extract points to. | ||
|- | |- | ||
| Extract | | |{{Button|Extract points}} | ||
|Extracts points from unlocked nodes. | |||
|} | |} | ||
=== Artifact Analyzer === | === Artifact Analyzer === | ||
[[File:Analyzer-full.png|alt=Artifact | [[File:Analyzer-full.png|84x84px]] | ||
'''Artifact Analyzer''' automatically scans any artifact placed on top of it (no need to wrench) and relays that information to connected analysis console. | |||
Two can be connected via a {{Item|multitool}}. | |||
=== Node Scanner === | |||
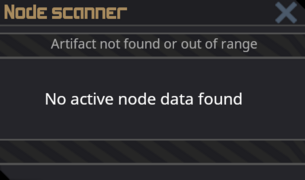
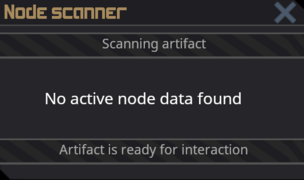
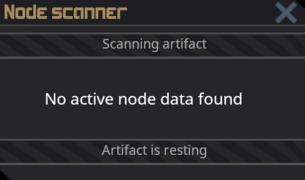
{{Slotted image|Node scanner.png|dims=84px|alt=Node scanner equipment icon}} | |||
'''Node Scanner''' is used on artifact to display its state as well as nodes with activated triggers. It is activated by left-clicking on an artifact. | |||
'''Artifact''' '''state''' is its readiness to being triggered, it is displayed at the bottom of the window. The state cycles between idle, resonating and resting — see [[User:Aliser/Xeno 2.0#Unlocking nodes|the process]] for details. | |||
Seeing which nodes are being triggered can be useful to prevent interference between them. This can happen when multiple nodes have a same trigger (or triggers), which causes them to try to activate all at once. Starting from a more «rare» trigger (that doesn't occur within as many nodes) can prove helpful. | |||
<gallery mode="packed" class="smooth-render"> | |||
Node scanner, not connected.png|No artifact selected | |||
Node scanner, connected, idle arti.png|Artifact is idle, ready to be experimented on | |||
Node scanner, connected, arti active.png|Interacting with an artifact by activating one of its triggers | |||
Node scanner, connected, arti resting.png|Artifact comes to a resting state after an interaction | |||
</gallery> | |||
=== Artifact Containers === | |||
[[File:Artifact container icon.png|84px]] | |||
[[File:Xeno artifact handheld container.png|84px]] | |||
'''Artifact Containers''' are containers for artifacts. There are 2 variants: '''standard''', for big and small artifacts, and '''handheld''', for small artifacts. As the name suggest, the latter can be carried in hand (and inventory), while the standard variant can only be dragged. | |||
Artifact Containers offer protection from ''almost all'' artifact effects (such as radioactivity), as well as prevent anyone but crew with science access to mess with the artifact by triggering its nodes or manually activating it (granted the container is locked). | |||
Both containers can be closed and locked. Unlocking a container requires R&D access. While unlocked, anyone is able to open it. | |||
One or few artifact containers are usually found at Xeno round-start, but more can be ordered from Cargo for {{Spesos|500}}, both standard and handheld. Artifact containers cannot be fabricated. | |||
=== Artifact Crusher === | |||
[[File:Artifact crusher-East-14449.png|84px]] | |||
'''Artifact crusher''' is a machine used to crush artifacts to '''artifact fragments'''. | |||
{{Callout|Tip|Requires '''Artifact Recycling''', a Tier 2 {{colored text|MediumPurple|Experimental}} research.|header=Requires research}} | |||
To crush an artifact, open the crusher, move or place an artifact in, close it and activate ({{Keys|Alt|Mouse Left}}) or through the {{Key|Mouse Right}}-menu). Crushing any artifact will yield 1-4 artifact fragments. | |||
Artifact fragments can be assembled into a new random hand-sized artifact through the build menu → «artifact», requiring 4 fragments. | |||
== Unlocking nodes == | |||
[[File:Sci xeno closets.png|thumb|Closets often found an Xeno containing protective equipment]] | |||
Start by opening '''Analysis Console'''. | |||
Select a locked node. Check out both the triggers and the effect. If needed, prepare suitable equipment (radiation suit, biohazard gear, bomb suit, mask, etc.). | |||
Activate any of the listed triggers, then the next, until all triggers for a node are activated. Note that the initial «window» for activating more triggers is <u>5 seconds</u> and it '''increases''' with each activated trigger by 5 more seconds, resetting once the time runs out. | |||
{{Quote|It slows down before uneventfully stopping. | |||
[[File:Artifact-activation-fail1.ogg]] | |||
|Artifact, activation failed | |||
| inline = 1 | |||
}} | |||
After a first trigger is activated, watch the artifact «react» with shimmering colors and a message popup: | |||
{{Quote|It begins to shift in strange ways...|Artifact, starting to resonate | |||
| inline = 1 | |||
}} | |||
Order of trigger activation ''does not matter'' for a particular node, but might matter in relation to ''other'' nodes. If a trigger is common (meaning it is present in multiple/many other nodes), once activated, it might interfere with the activation attempt just because of how many other nodes with the same trigger there are. In short, if having trouble, try to start with a more «rare» trigger. | |||
Once node is unlocked, the artifact will make an «unlocking» sound and the unlocked node will become active. | |||
{{Quote|It slows down, visibly changed. | |||
[[File: | [[File:Artifact1.ogg]] | ||
|Artifact, successful activation | |||
| inline = 1 | |||
}} | |||
''{{Colored text|gray|Manual activation, by touch (or with Z key)}}''<br> | |||
[[File:Artifact-force-activated1.ogg]] | |||
Once node is unlocked, a number of research points can be claimed with {{Button|Extract points}}. The more deeper the node was, the higher would be the amount. | |||
== Triggers == | |||
'''Trigger''' is a node unlocking action performed near an artifact by a crew member, other entity or environment. Nodes on deeper layers require multiple triggers to unlock. | |||
Most triggers require being near the artifact with the triggering action. | |||
{| class="wikitable" | {| class="wikitable" | ||
|+ | |+Triggers | ||
! | !Trigger | ||
!Use | !Difficulty | ||
!Description | |||
!Notes | |||
|- | |||
|Harmonical sound vibrations | |||
|'''{{Colored text|lime|Easy}}''' | |||
|Play a musical instrument near the artifact. | |||
|Does not require to play any actual MIDI's. Opening instrument's UI is enough to activate the trigger. | |||
|- | |||
|Close inspection | |||
|'''{{Colored text|lime|Easy}}''' | |||
|Examine the artifact. | |||
|Use right-click menu → '''Examine''' or shift+left-click the artifact. | |||
|- | |||
|Low pressure | |||
|'''{{Colored text|lime|Easy}}''' | |||
|Drop pressure below 50 kPa. | |||
|Xeno chambers are usually equipped with blast doors to space, togglable by a nearby button. Opening them for a few second should drop the pressure enough. Do not forget to close before going in! | |||
Mind the pressure dropping too low, potentially interfering with the '''Oxygen-free environment''' trigger. | |||
|- | |||
|Death | |||
|'''{{Colored text|yellow|Medium}}''' | |||
|Kill something near the artifact. | |||
|Catch a mouse, steal a monkey, make a kobold from a cube. Animal cubes are an easy way to get a supply of flesh beings to assassinate. Ask kitchen for some. | |||
'''Handcuffs''' are recommended for animals that can fight back (such as monkeys and kobolds), unless you feeling adventurous. {{Item|makeshift handcuffs}} are easy to make, available in build menu and requiring only {{Item|lv|15}}. | |||
|- | |||
|Physical damage | |||
|'''{{Colored text|lime|Easy}}''' | |||
|Damage the artifact. | |||
|Anything that can do damage will do. | |||
Keep in mind that {{Item|artifact crusher}} does {{Blunt|10}} damage. | |||
|- | |||
|Being thrown | |||
|'''{{Colored text|lime|Easy}}''' | |||
|Pickup and throw the artifact. | |||
|Handheld artifacts only. | |||
|- | |||
|Blood | |||
|'''{{Colored text|lime|Easy}}''' | |||
|Splash blood onto the artifact. | |||
|Syringe and a beaker as a go-to combo for this, both made at an autholathe. Often found round-start in R&D. | |||
Draw some blood using a syringe on yourself, your fellow colleague (consent is optional) or a puddle of blood. Transfer contents to beaker (by clicking on the beaker; if does not work, make sure the syringe is set to '''inject'''). Enter '''harm mode''' and "punch" the artifact with a beaker, splashing 5u from it. | |||
|- | |||
|Radiation | |||
|'''{{Colored text|yellow|Medium}}''' | |||
|Irradiate the artifact. | |||
|Use an {{Item|uranium shiv}} or {{Item|uranium spear}} to poke the artifact. Both can be made using build menu and require {{Item|uranium}} to make. Uranium is usually available at '''Engineering''' round-start as a reserve fuel for the generators. | |||
{{Callout|Tip|Using other radiation sources (such as other radioactive artifacts, damaged RTGs, etc.) currently '''does not work''', pending https://github.com/space-wizards/space-station-14/issues/37209}} | |||
|- | |||
|Magnetic waves | |||
|'''{{Colored text|yellow|Medium}}''' | |||
|Induce magnetic waves near the artifact. | |||
|Use magboots. Don't forget to turn them on. | |||
Magboots are available round-start at Engineering. They can be researched later with a T1 Experimental research and made on a {{Item|protolathe}}. | |||
|- | |||
|Water | |||
|'''{{Colored text|lime|Easy}}''' | |||
|Splash water onto the artifact. | |||
|Water bottle is available round-start in survival kits. Open, splash. If empty or lost, water coolers are pretty abundant. | |||
|- | |||
|High temperature gas | |||
|'''{{Colored text|lime|Easy}}''' | |||
|Raise temperature around the artifact. | |||
|Welder is the easiest way to activate this trigger, found laying around, in vending machines, robo-vend, etc. Can be made at an {{Item|autolathe}}. Grab a welder, activate, hit the artifact a few times. | |||
Alternatively, use a {{Item|heater}} and a canister of some gas, or ask Atmos to get a canister of heated gas. | |||
|- | |||
|Oxygen-free environment | |||
|'''{{Colored text|lime|Easy}}''' | |||
|Get rid of any oxygen around the artifact. | |||
|Space the artifact room (see notes for the low pressure trigger for details) until there is no air left. | |||
This might interfere with the '''Low pressure trigger''', since when pressure is near zero both can activate. | |||
|- | |||
|High pressure | |||
|'''{{Colored text|yellow|Medium}}''' | |||
|Pressurize the artifact room above to 300-500 kPa. | |||
|Use canisters of gas and gas systems setup for the Xeno chambers. Usually requires at least 2 canister to achieve the desired pressure. | |||
Can be trivialized with a {{Item|holofan}} by placing a holo on the artifact chamber vent and pressurizing. Because {{Item|holofan}} restricts movement in and out of a cell, all the gas going into the chamber will accumulate in that one tile with the vent. Can be trivialized even further by placing a holo on any tile, moving a gas canister in and opening a valve at desired pressure. {{Item|holofan}} is available round-start in limited count to Atmos techs, but can later be researched with '''Advanced Atmospherics''', a Tier 2 Industrial research. Don't forget to move the artifact into the holo! | |||
|- | |||
|Screwing | |||
|'''{{Colored text|lime|Easy}}''' | |||
|Screw the artifact. | |||
|Use a {{Item|screwdriver}} on the artifact (can be fabricated on an {{Item|autolathe}}). | |||
|- | |||
|Pulsing | |||
|'''{{Colored text|lime|Easy}}''' | |||
|Pulse the artifact. | |||
|Use a {{Item|multitool}} on the artifact (can be fabricated on an {{Item|autolathe}}). | |||
|- | |- | ||
| | |Low temperature gas | ||
| | |'''{{Colored text|yellow|Medium}}''' | ||
|Decrease temperature around the artifact. | |||
|Requires a cooled down gas (e.g. with a {{Item|freezer}}) or a cooling gas like '''frezon''' (hard to produce, thus usually not available early round). Ask your fellow Atmos friend to help if no freezer setup is available at R&D or make a freezer (requires '''Atmospherics''', a Tier 1 Industrial research). | |||
|- | |- | ||
| | |Prying | ||
| | |'''{{Colored text|lime|Easy}}''' | ||
| | |||
{| class="wikitable" | |||
|- | |- | ||
|Item | |Pry the artifact. | ||
| | |} | ||
|Use a {{Item|crowbar}} on the artifact (can be fabricated on an {{Item|autolathe}}). | |||
|- | |- | ||
| | |Tightening | ||
| | |'''{{Colored text|lime|Easy}}''' | ||
|Tighten the artifact. | |||
|Use a {{Item|wrench}} on the artifact (can be fabricated on an {{Item|autolathe}}). | |||
|- | |- | ||
| | |Carbon dioxide | ||
| | |'''{{Colored text|yellow|Medium}}''' | ||
|Apply carbon dioxide. | |||
|A CO2 canister sometimes is available round-start at R&D. If not, ask your nearest Atmos technician for one. | |||
Same {{Item|holofan}} tips apply as for the '''High pressure''' trigger. | |||
|- | |- | ||
| | |Non-solid plasma | ||
| | |'''{{Colored text|yellow|Medium}}''' | ||
|Apply non-solid plasma. | |||
|A plasma canister sometimes is available round-start at R&D. If not, ask your nearest Atmos technician for one. | |||
Alternatively, get solid plasma and grind it in a grinder (sometimes available round-start at R&D; if not, easy to make). One solid plasma grinds for 10u. | |||
Same {{Item|holofan}} tips apply as for the '''High pressure''' trigger. | |||
|- | |- | ||
| | |Nitrous oxide | ||
| | |'''{{Colored text|yellow|Medium}}''' | ||
|Apply nitrous oxide. | |||
|A nitrous oxide canister rarely available round-start at R&D. If not, ask your nearest Atmos technician for one. | |||
Same {{Item|holofan}} tips apply as for the '''High pressure''' trigger. | |||
|- | |- | ||
| | |Regular self-activation | ||
| | |'''{{Colored text|yellow|Medium}}''' | ||
|Wait for the artifact to activate itself. | |||
|Artifacts with this trigger have a «timer» on them. Inspect the artifact to see what it's currently at. When it runs out, the trigger will activate. | |||
|- | |- | ||
| | |Tritium | ||
| | |'''{{Colored text|yellow|Medium}}''' | ||
|Apply tritium. | |||
|Ask Atmos for a canister. Sometimes they have a canister round-start, sometimes they have a tritium miner. | |||
Same {{Item|holofan}} tips apply as for the '''High pressure''' trigger. | |||
|- | |- | ||
| | |Frezon | ||
| | |'''{{Colored text|red|Hard}}''' | ||
|Apply frezon. | |||
|Frezon is never available round-start, it has to be made by Atmos. Sometimes, Botany manages to make some. | |||
Same {{Item|holofan}} tips apply as for the '''High pressure''' trigger. | |||
|- | |- | ||
| | |Ammonia | ||
| | |'''{{Colored text|yellow|Medium}}''' | ||
|Apply ammonia. | |||
|Sometimes available at Atmos. If not, ask a Chemist for a some (liquid form). | |||
Same {{Item|holofan}} tips apply as for the '''High pressure''' trigger. | |||
|} | |} | ||
=== Technical === | |||
== | ==== Weights ==== | ||
A table displaying chance of specific triggers generating in an artifact. | |||
{{Spoiler| | |||
{{Weight table|xeno triggers}} | |||
}} | |||
== Effects == | |||
'''Effect''' is something that artifact does when a node is unlocked or through a manual activation. | |||
{| class="wikitable" | {| class="wikitable" | ||
|+Effects | |||
!Effect | |||
!Danger | |||
!Notes | |||
|- | |||
|Obtains ability of container for chemical solutions | |||
|'''{{Colored text|gray|None}}''' | |||
|Becomes a {{U|150}} solution storage. | |||
|- | |||
|Creates musical instrument | |||
|'''{{Colored text|gray|None}}''' | |||
| | |||
|- | |||
|Cools down surrounding gas | |||
|'''{{Colored text|yellow|Minor}}''' | |||
| | |||
|- | |||
|Minor implosion | |||
|'''{{Colored text|yellow|Minor}}''' | |||
| | |||
|- | |||
|Produces puddle of chemical mixture | |||
|tbd | |||
| | |||
|- | |||
|Creates primate | |||
|'''{{Colored text|gray|None}}''' | |||
| | |||
|- | |||
|Create money | |||
|'''{{Colored text|gray|None}}''' | |||
| | |||
|- | |||
|Charges up batteries | |||
|'''{{Colored text|gray|None}}''' | |||
|Charges all batteries in a 15-tile radius. | |||
|- | |||
|Creates anomaly | |||
|'''{{Colored text|yellow|Minor}}''' | |||
|Creates a random anomaly. | |||
|- | |||
|Produces flora | |||
|'''{{Colored text|gray|None}}''' | |||
| | |||
|- | |||
|Create friendly fauna | |||
|'''{{Colored text|lightsalmon|Medium}}''' | |||
|Creates a random animal. | |||
{{Callout|Tip|Can create '''non-friendly''' fauna too, such as slimes. Fix pending https://github.com/space-wizards/space-station-14/issues/37302}} | |||
|- | |||
|Minor electromagnetic interference | |||
|'''{{Colored text|gray|None}}''' | |||
|Causes lights to flicker. | |||
|- | |||
|Create recyclable junk | |||
|'''{{Colored text|gray|None}}''' | |||
| | |||
|- | |||
|Broadcasts sublime message | |||
|'''{{Colored text|gray|None}}''' | |||
| | |||
|- | |||
|Break windows | |||
|'''{{Colored text|lightsalmon|Medium}}''' | |||
| | |||
|- | |||
|Becomes mildly radioactive | |||
|'''{{Colored text|lightsalmon|Medium}}''' | |||
| | |||
|- | |||
|Produces chemical foam | |||
|'''{{Colored text|lightsalmon|Medium}}''' | |||
| | |||
|- | |||
|Produces potassium | |||
|'''{{Colored text|yellow|Minor}}''' | |||
| | |||
|- | |||
|Explosion | |||
|'''{{Colored text|red|Major}}''' | |||
| | |||
|- | |||
|Expels nitrous oxide | |||
|'''{{Colored text|yellow|Minor}}''' | |||
| | |||
|- | |||
|Starts to move sporadically | |||
|'''{{Colored text|gray|None}}''' | |||
|Moves in random direction every 1-3 seconds. | |||
|- | |||
|Expels carbon dioxide | |||
|'''{{Colored text|yellow|Minor}}''' | |||
| | |||
|- | |||
|Creates wave of helpful foam | |||
|'''{{Colored text|lightsalmon|Medium}}''' | |||
| | |||
|- | |||
|Obtains ability of omnitool | |||
|'''{{Colored text|gray|None}}''' | |||
|Available on handheld artifacts only. | |||
|- | |||
|Create hostile fish | |||
|'''{{Colored text|lightsalmon|Medium}}''' | |||
| | |||
|- | |||
|Obtains ability of drill | |||
|'''{{Colored text|gray|None}}''' | |||
|Available on handheld artifacts only. | |||
|- | |||
|Improves holder movement speed | |||
|'''{{Colored text|gray|None}}''' | |||
|Improves walking and running speed when holding/dragging the artifact by 1.2 and 1.3 times respectively. | |||
|- | |- | ||
|Heats up surrounding gas greatly | |||
|'''{{Colored text|lightsalmon|Medium}}''' | |||
| | |||
|- | |- | ||
| | |Mild electromagnetic interference | ||
|'''{{Colored text|yellow|Minor}}''' | |||
|Causes lights to flicker. | |||
|- | |- | ||
| | |Create plastic | ||
|'''{{Colored text|gray|None}}''' | |||
| | |||
|- | |- | ||
| | |Create steel | ||
|'''{{Colored text|gray|None}}''' | |||
| | |||
|- | |- | ||
| | |Create glass | ||
|'''{{Colored text|gray|None}}''' | |||
| | |||
|- | |- | ||
| | |Becomes highly radioactive | ||
|'''{{Colored text|lightsalmon|Medium}}''' | |||
| | |||
|- | |- | ||
| | |Switch places of sentient beings | ||
|tbd | |||
| | |||
|- | |- | ||
| | |Expels ammonia | ||
|} | |'''{{Colored text|yellow|Minor}}''' | ||
| | |||
|- | |- | ||
|Becomes sentient | |||
|'''{{Colored text|lightsalmon|Medium}}''' | |||
| | |||
|- | |- | ||
| | |Create short-living bluespace portal | ||
|'''{{Colored text|yellow|Minor}}''' | |||
| | |||
|- | |- | ||
| | |Expels tritium | ||
|'''{{Colored text|lightsalmon|Medium}}''' | |||
| | |||
|- | |- | ||
| | |Expels plasma | ||
|'''{{Colored text|lightsalmon|Medium}}''' | |||
| | |||
|- | |- | ||
| | |Temporarily reshape flesh to scale | ||
|'''{{Colored text|yellow|Minor}}''' | |||
| | |||
|- | |- | ||
| | |Becomes phased | ||
|'''{{Colored text|gray|None}}''' | |||
| | |||
|- | |- | ||
| | |Temporarily reshape flesh to fur | ||
|'''{{Colored text|yellow|Minor}}''' | |||
| | |||
|- | |- | ||
| | |Temporarily reshape flesh to light | ||
|'''{{Colored text|yellow|Minor}}''' | |||
| | |||
|- | |- | ||
| | |Create small gravity well | ||
|'''{{Colored text|gray|None}}''' | |||
| | |||
|- | |- | ||
| | |Creates wave of harmful foam | ||
|'''{{Colored text|lightsalmon|Medium}}''' | |||
| | |||
|- | |- | ||
| | |Create plasma | ||
|'''{{Colored text|gray|None}}''' | |||
| | |||
|- | |- | ||
| | |Creates puddle of helpful chemicals | ||
|'''{{Colored text|gray|None}}''' | |||
| | |||
|- | |- | ||
| | |Dangerous electromagnetic interference | ||
|'''{{Colored text|yellow|Minor}}''' | |||
|EMP pulse in a 5-tile radius, disabling affected devices for 1 minute/ | |||
|- | |- | ||
| | |Pyrokinesis | ||
|} | |'''{{Colored text|red|Major}}''' | ||
| | |||
| | |||
|- | |- | ||
| | |Teleportation | ||
| | |tbd | ||
| | |||
|- | |- | ||
| | |Create gold | ||
| | |'''{{Colored text|gray|None}}''' | ||
| | |||
|- | |- | ||
| | |Create rare materials | ||
| | |'''{{Colored text|gray|None}}''' | ||
| | |||
|- | |- | ||
| | |Expels frezon | ||
| | |'''{{Colored text|yellow|Minor}}''' | ||
| | |||
|- | |- | ||
| | |Small scale high-speed nuclear reaction | ||
| | |'''{{Colored text|red|Major}}''' | ||
| | |||
|- | |- | ||
| | |Miraclous healing | ||
| | |'''{{Colored text|gray|None}}''' | ||
| | |||
|- | |- | ||
| | |Create light interference | ||
| | |'''{{Colored text|gray|None}}''' | ||
| | |||
|- | |- | ||
| | |Create uranium | ||
| | |'''{{Colored text|gray|None}}''' | ||
| | |||
|- | |- | ||
| | |Create artifact | ||
| | |'''{{Colored text|yellow|Minor}}''' | ||
| | |||
|} | |} | ||
=== Technical === | |||
==== Weights ==== | |||
A table displaying chance of specific effects generating in an artifact. | |||
{{Spoiler| | |||
{{Weight table|xeno effects}} | |||
}} | |||
Latest revision as of 23:45, 17 May 2025
Xenoarcheology (aka Xeno) is a branch of R&D, providing a method of point generation utilizing randomly generated artifacts. It is the job of scientists to discover and activate the secrets of these artifacts.
Artifacts

Artifacts are mysterious objects Science can study and experiment on, unlocking their potential in variety of effects, whilst generating points to advance research. Their appearance varies, size included.
One or few artifacts are usually available round-start in «xeno» part of Science. More can be bought at Cargo for ![]() 2,000 a piece, found by Salvage, found from a Bluespace Artifact station event or assembled from artifact fragments.
2,000 a piece, found by Salvage, found from a Bluespace Artifact station event or assembled from artifact fragments.
Each artifact has a set of «nodes» — each is an effect that can be activated via a corresponding trigger (or triggers). Nodes are assembled into a tree-like structure, with distinct layers. Each layer inherits previous layer's triggers, while acquiring one or few new ones. This means that for more in-depth nodes it is gradually harder to activate them. Point output also scales with depth.
For each activation attempt, a time window of 5 seconds is given to activate any trigger. Once a trigger is activated, 5 seconds added to the clock. This happens for each activated trigger, meaning the more triggers a node has, the wider the activation window.
Once a node is unlocked, its effect is activated and it becomes active. An active node cannot be activated again via its triggers, but it can be activated manually. By left-clicking an artifact (or pressing Z while holding one), all active nodes activate all on once, consuming one durability in each node. Once durability of a node is depleted, it can no longer be activated (not by triggers nor manually). Unlocking next in-depth connected node will lock the current node, even it has more durability left.
Unlocking all nodes of an artifact currently has no reward, but you still get points from each node.
Equipment
To start experimentation only two pieces of equipment are needed: Analysis Console and Artifact Analyzer.
Analysis Console

Analysis console is the main method of getting information about the artifacts that are being researched. In order to properly use it, it must be linked to an artifact analyzer via ![]() multitool as well as have a research server selected (usually already selected).
multitool as well as have a research server selected (usually already selected).
From the console itself, the screen displays information about an artifact laying on top of linked Artifact Analyzer.

Left side of the window displays information about the currently selected node. Right side is the tree-like representation of all the nodes inside an artifact, starting from the bottom going up.
To view information about a node, click on it. To get the full picture (effects and triggers), all of the predecessor nodes must be unlocked first.
| Element | Description |
|---|---|
| ID | Unique node identificator. Useful for the node scanner. |
| Class | Layer name. Nodes on the same layer (horizontally) share the same layer name. |
| Status | Node status:
|
| Durability | Amount of available manual activations once a node is unlocked. |
| Effect | Effect that will happen once a node is activated or with every manual activation. |
| Triggers | Triggers needed to activate a node for the first time. |
| Server | Allows to choose a server to extract points to. |
| Extract points | Extracts points from unlocked nodes. |
Artifact Analyzer

Artifact Analyzer automatically scans any artifact placed on top of it (no need to wrench) and relays that information to connected analysis console.
Two can be connected via a ![]() multitool.
multitool.
Node Scanner

Node Scanner is used on artifact to display its state as well as nodes with activated triggers. It is activated by left-clicking on an artifact.
Artifact state is its readiness to being triggered, it is displayed at the bottom of the window. The state cycles between idle, resonating and resting — see the process for details.
Seeing which nodes are being triggered can be useful to prevent interference between them. This can happen when multiple nodes have a same trigger (or triggers), which causes them to try to activate all at once. Starting from a more «rare» trigger (that doesn't occur within as many nodes) can prove helpful.
-
 No artifact selected
 -
 Artifact is idle, ready to be experimented on
 -
 Interacting with an artifact by activating one of its triggers
 -
 Artifact comes to a resting state after an interaction
Artifact Containers
![]()

Artifact Containers are containers for artifacts. There are 2 variants: standard, for big and small artifacts, and handheld, for small artifacts. As the name suggest, the latter can be carried in hand (and inventory), while the standard variant can only be dragged.
Artifact Containers offer protection from almost all artifact effects (such as radioactivity), as well as prevent anyone but crew with science access to mess with the artifact by triggering its nodes or manually activating it (granted the container is locked).
Both containers can be closed and locked. Unlocking a container requires R&D access. While unlocked, anyone is able to open it.
One or few artifact containers are usually found at Xeno round-start, but more can be ordered from Cargo for ![]() 500 , both standard and handheld. Artifact containers cannot be fabricated.
500 , both standard and handheld. Artifact containers cannot be fabricated.
Artifact Crusher

Artifact crusher is a machine used to crush artifacts to artifact fragments.
Requires research
Requires Artifact Recycling, a Tier 2 Experimental research.
To crush an artifact, open the crusher, move or place an artifact in, close it and activate (Alt+Mouse Left) or through the Mouse Right-menu). Crushing any artifact will yield 1-4 artifact fragments.
Artifact fragments can be assembled into a new random hand-sized artifact through the build menu → «artifact», requiring 4 fragments.
Unlocking nodes

Start by opening Analysis Console.
Select a locked node. Check out both the triggers and the effect. If needed, prepare suitable equipment (radiation suit, biohazard gear, bomb suit, mask, etc.).
Activate any of the listed triggers, then the next, until all triggers for a node are activated. Note that the initial «window» for activating more triggers is 5 seconds and it increases with each activated trigger by 5 more seconds, resetting once the time runs out.
It slows down before uneventfully stopping.
After a first trigger is activated, watch the artifact «react» with shimmering colors and a message popup:
It begins to shift in strange ways...
Order of trigger activation does not matter for a particular node, but might matter in relation to other nodes. If a trigger is common (meaning it is present in multiple/many other nodes), once activated, it might interfere with the activation attempt just because of how many other nodes with the same trigger there are. In short, if having trouble, try to start with a more «rare» trigger.
Once node is unlocked, the artifact will make an «unlocking» sound and the unlocked node will become active.
It slows down, visibly changed.
Manual activation, by touch (or with Z key)
Once node is unlocked, a number of research points can be claimed with Extract points. The more deeper the node was, the higher would be the amount.
Triggers
Trigger is a node unlocking action performed near an artifact by a crew member, other entity or environment. Nodes on deeper layers require multiple triggers to unlock.
Most triggers require being near the artifact with the triggering action.
| Trigger | Difficulty | Description | Notes | |
|---|---|---|---|---|
| Harmonical sound vibrations | Easy | Play a musical instrument near the artifact. | Does not require to play any actual MIDI's. Opening instrument's UI is enough to activate the trigger. | |
| Close inspection | Easy | Examine the artifact. | Use right-click menu → Examine or shift+left-click the artifact. | |
| Low pressure | Easy | Drop pressure below 50 kPa. | Xeno chambers are usually equipped with blast doors to space, togglable by a nearby button. Opening them for a few second should drop the pressure enough. Do not forget to close before going in!
Mind the pressure dropping too low, potentially interfering with the Oxygen-free environment trigger. | |
| Death | Medium | Kill something near the artifact. | Catch a mouse, steal a monkey, make a kobold from a cube. Animal cubes are an easy way to get a supply of flesh beings to assassinate. Ask kitchen for some.
Handcuffs are recommended for animals that can fight back (such as monkeys and kobolds), unless you feeling adventurous. makeshift handcuffs are easy to make, available in build menu and requiring only | |
| Physical damage | Easy | Damage the artifact. | Anything that can do damage will do.
Keep in mind that artifact crusher does 10 blunt damage. | |
| Being thrown | Easy | Pickup and throw the artifact. | Handheld artifacts only. | |
| Blood | Easy | Splash blood onto the artifact. | Syringe and a beaker as a go-to combo for this, both made at an autholathe. Often found round-start in R&D.
Draw some blood using a syringe on yourself, your fellow colleague (consent is optional) or a puddle of blood. Transfer contents to beaker (by clicking on the beaker; if does not work, make sure the syringe is set to inject). Enter harm mode and "punch" the artifact with a beaker, splashing 5u from it. | |
| Radiation | Medium | Irradiate the artifact. | Use an uranium shiv or uranium spear to poke the artifact. Both can be made using build menu and require Tip Using other radiation sources (such as other radioactive artifacts, damaged RTGs, etc.) currently does not work, pending https://github.com/space-wizards/space-station-14/issues/37209 | |
| Magnetic waves | Medium | Induce magnetic waves near the artifact. | Use magboots. Don't forget to turn them on.
Magboots are available round-start at Engineering. They can be researched later with a T1 Experimental research and made on a | |
| Water | Easy | Splash water onto the artifact. | Water bottle is available round-start in survival kits. Open, splash. If empty or lost, water coolers are pretty abundant. | |
| High temperature gas | Easy | Raise temperature around the artifact. | Welder is the easiest way to activate this trigger, found laying around, in vending machines, robo-vend, etc. Can be made at an Alternatively, use a heater and a canister of some gas, or ask Atmos to get a canister of heated gas. | |
| Oxygen-free environment | Easy | Get rid of any oxygen around the artifact. | Space the artifact room (see notes for the low pressure trigger for details) until there is no air left.
This might interfere with the Low pressure trigger, since when pressure is near zero both can activate. | |
| High pressure | Medium | Pressurize the artifact room above to 300-500 kPa. | Use canisters of gas and gas systems setup for the Xeno chambers. Usually requires at least 2 canister to achieve the desired pressure.
Can be trivialized with a holofan by placing a holo on the artifact chamber vent and pressurizing. Because holofan restricts movement in and out of a cell, all the gas going into the chamber will accumulate in that one tile with the vent. Can be trivialized even further by placing a holo on any tile, moving a gas canister in and opening a valve at desired pressure. holofan is available round-start in limited count to Atmos techs, but can later be researched with Advanced Atmospherics, a Tier 2 Industrial research. Don't forget to move the artifact into the holo! | |
| Screwing | Easy | Screw the artifact. | Use a | |
| Pulsing | Easy | Pulse the artifact. | Use a | |
| Low temperature gas | Medium | Decrease temperature around the artifact. | Requires a cooled down gas (e.g. with a freezer) or a cooling gas like frezon (hard to produce, thus usually not available early round). Ask your fellow Atmos friend to help if no freezer setup is available at R&D or make a freezer (requires Atmospherics, a Tier 1 Industrial research). | |
| Prying | Easy |
|
Use a | |
| Tightening | Easy | Tighten the artifact. | Use a wrench on the artifact (can be fabricated on an | |
| Carbon dioxide | Medium | Apply carbon dioxide. | A CO2 canister sometimes is available round-start at R&D. If not, ask your nearest Atmos technician for one.
Same holofan tips apply as for the High pressure trigger. | |
| Non-solid plasma | Medium | Apply non-solid plasma. | A plasma canister sometimes is available round-start at R&D. If not, ask your nearest Atmos technician for one.
Alternatively, get solid plasma and grind it in a grinder (sometimes available round-start at R&D; if not, easy to make). One solid plasma grinds for 10u. Same holofan tips apply as for the High pressure trigger. | |
| Nitrous oxide | Medium | Apply nitrous oxide. | A nitrous oxide canister rarely available round-start at R&D. If not, ask your nearest Atmos technician for one.
Same holofan tips apply as for the High pressure trigger. | |
| Regular self-activation | Medium | Wait for the artifact to activate itself. | Artifacts with this trigger have a «timer» on them. Inspect the artifact to see what it's currently at. When it runs out, the trigger will activate. | |
| Tritium | Medium | Apply tritium. | Ask Atmos for a canister. Sometimes they have a canister round-start, sometimes they have a tritium miner.
Same holofan tips apply as for the High pressure trigger. | |
| Frezon | Hard | Apply frezon. | Frezon is never available round-start, it has to be made by Atmos. Sometimes, Botany manages to make some.
Same holofan tips apply as for the High pressure trigger. | |
| Ammonia | Medium | Apply ammonia. | Sometimes available at Atmos. If not, ask a Chemist for a some (liquid form).
Same holofan tips apply as for the High pressure trigger. |
Technical
Weights
A table displaying chance of specific triggers generating in an artifact.
Effects
Effect is something that artifact does when a node is unlocked or through a manual activation.
| Effect | Danger | Notes |
|---|---|---|
| Obtains ability of container for chemical solutions | None | Becomes a |
| Creates musical instrument | None | |
| Cools down surrounding gas | Minor | |
| Minor implosion | Minor | |
| Produces puddle of chemical mixture | tbd | |
| Creates primate | None | |
| Create money | None | |
| Charges up batteries | None | Charges all batteries in a 15-tile radius. |
| Creates anomaly | Minor | Creates a random anomaly. |
| Produces flora | None | |
| Create friendly fauna | Medium | Creates a random animal.
Tip Can create non-friendly fauna too, such as slimes. Fix pending https://github.com/space-wizards/space-station-14/issues/37302 |
| Minor electromagnetic interference | None | Causes lights to flicker. |
| Create recyclable junk | None | |
| Broadcasts sublime message | None | |
| Break windows | Medium | |
| Becomes mildly radioactive | Medium | |
| Produces chemical foam | Medium | |
| Produces potassium | Minor | |
| Explosion | Major | |
| Expels nitrous oxide | Minor | |
| Starts to move sporadically | None | Moves in random direction every 1-3 seconds. |
| Expels carbon dioxide | Minor | |
| Creates wave of helpful foam | Medium | |
| Obtains ability of omnitool | None | Available on handheld artifacts only. |
| Create hostile fish | Medium | |
| Obtains ability of drill | None | Available on handheld artifacts only. |
| Improves holder movement speed | None | Improves walking and running speed when holding/dragging the artifact by 1.2 and 1.3 times respectively. |
| Heats up surrounding gas greatly | Medium | |
| Mild electromagnetic interference | Minor | Causes lights to flicker. |
| Create plastic | None | |
| Create steel | None | |
| Create glass | None | |
| Becomes highly radioactive | Medium | |
| Switch places of sentient beings | tbd | |
| Expels ammonia | Minor | |
| Becomes sentient | Medium | |
| Create short-living bluespace portal | Minor | |
| Expels tritium | Medium | |
| Expels plasma | Medium | |
| Temporarily reshape flesh to scale | Minor | |
| Becomes phased | None | |
| Temporarily reshape flesh to fur | Minor | |
| Temporarily reshape flesh to light | Minor | |
| Create small gravity well | None | |
| Creates wave of harmful foam | Medium | |
| Create plasma | None | |
| Creates puddle of helpful chemicals | None | |
| Dangerous electromagnetic interference | Minor | EMP pulse in a 5-tile radius, disabling affected devices for 1 minute/ |
| Pyrokinesis | Major | |
| Teleportation | tbd | |
| Create gold | None | |
| Create rare materials | None | |
| Expels frezon | Minor | |
| Small scale high-speed nuclear reaction | Major | |
| Miraclous healing | None | |
| Create light interference | None | |
| Create uranium | None | |
| Create artifact | Minor |
Technical
Weights
A table displaying chance of specific effects generating in an artifact.