The Exosuit Fabricator is a machine that is capable of crafting a large variety of [[Cyborg]] and [[Mech]] parts. The Exosuit Fabricator is a material hungry machine and can use {{item icon|gold bar|label=gold|size=32px}}, {{item icon|silver bar|label=silver|size=32px}}, {{item icon|steel|size=32px}}, {{item icon|plastic|size=32px}}, {{item icon|glass|size=32px}}, and {{item icon|plasma|size=32px}}. The Exosuit Fabricator is a vital part of [[Robotics#How to make a Borg ?|Cyborg creation]] and many of the advanced pieces are stuck behind research.
The Exosuit Fabricator is a machine that is capable of crafting a large variety of [[Cyborg]] and [[Mech]] parts. The Exosuit Fabricator is a material hungry machine and can use {{item icon|gold bar|label=gold}}, {{item icon|silver bar|label=silver}}, {{item icon|steel}}, {{item icon|plastic}}, {{item icon|glass}}, and {{item icon|plasma}}. The Exosuit Fabricator is a vital part of [[Robotics#How to make a Borg ?|Cyborg creation]] and many of the advanced pieces are stuck behind research.
Hyper convection machine are a highly valuable upgrade that is obtained from the Industrial Engineering research node. Hyper convection machines will craft items at a 50% discount from the original cost. The trade-off when it comes to these powerful machines is that they produce an immense amount of heat. The heat that is produced from these machines can quickly become lethal if sufficient preparations are not made. One of the ways to make a safe enclosure for hyper convection machines is:
Hyper convection machine are a highly valuable upgrade that is obtained from the Industrial Engineering research node. Hyper convection machines will craft items at a 50% discount from the original cost. The trade-off when it comes to these powerful machines is that they produce an immense amount of heat. The heat that is produced from these machines can quickly become lethal if sufficient preparations are not made. One of the ways to make a safe enclosure for hyper convection machines is:
#Un-wrench the machines and move the {{item icon|Protolathe|size=32px}}, {{item icon|Autolathe|size=32px}}, and {{item icon|Circuit Imprinter|size=32px}} to the back wall. If there is a {{item icon|R&D Computer|size=32px}}, move it out of the way.[[File:HyperA.png|alt=Hyperconvection building part 1|center]]
#Un-wrench the machines and move the {{item icon|Protolathe}}, {{item icon|Autolathe}}, and {{item icon|Circuit Imprinter}} to the back wall. If there is a {{item icon|R&D Computer}}, move it out of the way.[[File:HyperA.png|alt=Hyperconvection building part 1|center]]
#Build a 2x3 box of {{item icon|directional reinforced window|label=directional reinforced windows|size=32px}}. At the middle-right side of the box create a {{item icon|windoor|size=32px}}.[[File:HyperB.png|alt=Hyperconvection building part 2|center]]
#Build a 2x3 box of {{item icon|directional reinforced window|label=directional reinforced windows}}. At the middle-right side of the box create a {{item icon|windoor}}.[[File:HyperB.png|alt=Hyperconvection building part 2|center]]
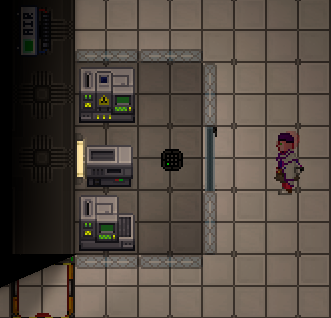
#Create an {{item icon|air alarm|size=32px}} and a {{item icon|air sensor|size=32px}}. Place the air sensor within the box at the center right, and the air alarm nearby for convenience.[[File:HyperC.png|alt=Hyperconvection building part 3|center]]
#Create an {{item icon|air alarm}} and a {{item icon|air sensor}}. Place the air sensor within the box at the center right, and the air alarm nearby for convenience.[[File:HyperC.png|alt=Hyperconvection building part 3|center]]
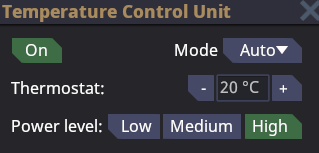
#Create one (required) or two (optional) {{item icon|space heater|label=space heater(s)|size=32px}} at the top-right and bottom-right of the box.[[File:HyperD.png|alt=Hyperconvection part 4|center]]4a. Set the space heaters to have {{button|High|state=pressed}} energy consumption and make sure that they are {{button|On|state=pressed}}.[[File:HyperD1.png|alt=Hyperconvection part 4.1|center]]
#Create one (required) or two (optional) {{item icon|space heater|label=space heater(s)}} at the top-right and bottom-right of the box.[[File:HyperD.png|alt=Hyperconvection part 4|center]]4a. Set the space heaters to have {{button|High|state=pressed}} energy consumption and make sure that they are {{button|On|state=pressed}}.[[File:HyperD1.png|alt=Hyperconvection part 4.1|center]]
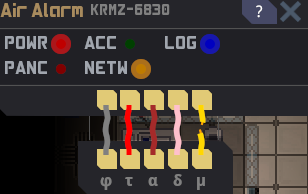
#Either [[Hacking|hack]] the air alarm or ask an engineer to help you with [[networking]]. To [[Hacking|hack]] the air alarm we must first use a {{item icon|screwdriver|size=32px}} on it to open the panel. When the panel is open use a {{item icon|wirecutter|size=32px}} tool on the air alarm itself. The lights above refer to the wires below. The wire that we are looking to cut is the ACC wire. The ACC wire is what controls who is authorized to network and control the Air Alarm.[[File:HyperE1.png|alt=Air alarm panel|center]]5a. Cut the wires from left to right (by clicking on them with a wirecutter in hand) until you get the ACC light to turn off. You may get unlucky like I did and hit a power wire before the ACC wire, you will get shocked because of this. Skip the power wire and continue until you reach the ACC wire. Once you have found the ACC wire repair all other wires (by clicking on them with a wirecutter in hand) and leave the ACC wire cut. Close the panel on the air alarm with the screwdriver.[[File:HyperE2.png|alt=Hyperconvection part 4.2|center]]
#Either [[Hacking|hack]] the air alarm or ask an engineer to help you with [[networking]]. To [[Hacking|hack]] the air alarm we must first use a {{item icon|screwdriver}} on it to open the panel. When the panel is open use a {{item icon|wirecutter}} tool on the air alarm itself. The lights above refer to the wires below. The wire that we are looking to cut is the ACC wire. The ACC wire is what controls who is authorized to network and control the Air Alarm.[[File:HyperE1.png|alt=Air alarm panel|center]]5a. Cut the wires from left to right (by clicking on them with a wirecutter in hand) until you get the ACC light to turn off. You may get unlucky like I did and hit a power wire before the ACC wire, you will get shocked because of this. Skip the power wire and continue until you reach the ACC wire. Once you have found the ACC wire repair all other wires (by clicking on them with a wirecutter in hand) and leave the ACC wire cut. Close the panel on the air alarm with the screwdriver.[[File:HyperE2.png|alt=Hyperconvection part 4.2|center]]
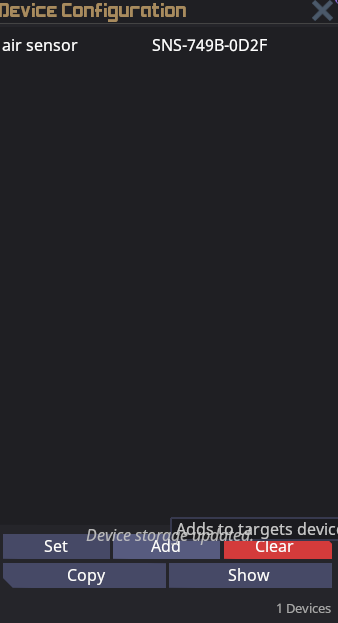
#Use a {{item icon|multitool|size=32px}} or a {{item icon|network configurator|size=32px}} and click on the air sensor first, followed by the air alarm.[[File:HyperF2.png|alt=air sensor clicked|center]]6a. Click {{button|Add}} on the air alarm GUI and then close the GUI.[[File:HyperF1.png|alt=Air alarm networking|center]]
#Use a {{item icon|multitool}} or a {{item icon|network configurator}} and click on the air sensor first, followed by the air alarm.[[File:HyperF2.png|alt=air sensor clicked|center]]6a. Click {{button|Add}} on the air alarm GUI and then close the GUI.[[File:HyperF1.png|alt=Air alarm networking|center]]
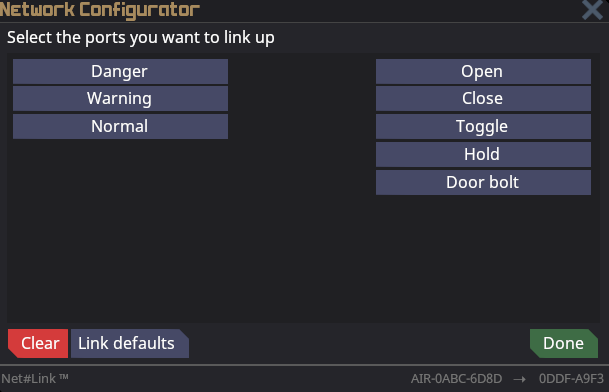
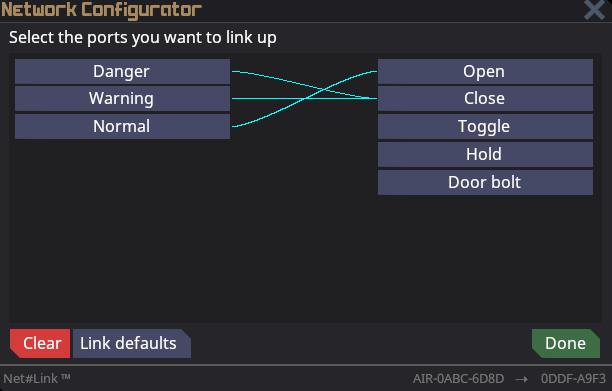
#In a similar process, use a multitool or a network configurator and click on the windoor first, followed by the air alarm. [[File:HyperG1.png|alt=Hyperconvection networking windoor|center]]7a. Click the {{button|Danger}} button and then click {{button|Close}}. Click on the {{button|Warning}} button and click {{button|Close}}. Finally, click the {{button|Normal}} button and then click {{button|Open}}. Then click the {{button|Done}} button.[[File:HyperG2.png|alt=Hyperconvection networking windoor|center]]
#In a similar process, use a multitool or a network configurator and click on the windoor first, followed by the air alarm. [[File:HyperG1.png|alt=Hyperconvection networking windoor|center]]7a. Click the {{button|Danger}} button and then click {{button|Close}}. Click on the {{button|Warning}} button and click {{button|Close}}. Finally, click the {{button|Normal}} button and then click {{button|Open}}. Then click the {{button|Done}} button.[[File:HyperG2.png|alt=Hyperconvection networking windoor|center]]
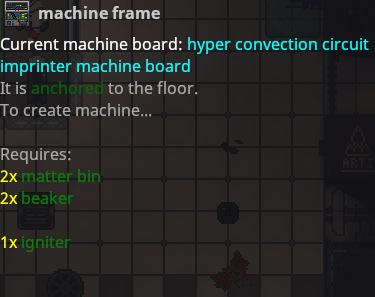
#Create the {{item icon|CircuitImprinterHyperConvectionMachineCircuitboard|size=32px}} at the Circuit Imprinter. Create or gather 1 matter bin and 1 igniter. Use a screwdriver to open the panel on the Circuit Imprinter.[[File:Imprinter_panel_open.png|alt=Imprinter panel open|center]]8a. Use a crowbar to deconstruct the imprinter into a machine frame.[[File:Imprinter_machineframe.png|alt=Imprinter machineframe|center]]8b. Use a crowbar again to remove the parts from the machine frame.[[File:Imprinter_machineframe1.png|alt=Imprinter machineframe1|center]]8c. Remove the Circuit Imprinter machine board from the stack of items. Click on the machine frame while holding the hyper convection Circuit Imprinter machine board. Shift click the machine frame and fill it with the rest of the materials that it requires. (You should have all the materials if the previous steps were followed).[[File:Machine_frame_p3.png|center]]8d. Screwdriver the machine frame to finish the construction. (If this does not work you are missing materials).
#Create the {{item icon|CircuitImprinterHyperConvectionMachineCircuitboard}} at the Circuit Imprinter. Create or gather 1 matter bin and 1 igniter. Use a screwdriver to open the panel on the Circuit Imprinter.[[File:Imprinter_panel_open.png|alt=Imprinter panel open|center]]8a. Use a crowbar to deconstruct the imprinter into a machine frame.[[File:Imprinter_machineframe.png|alt=Imprinter machineframe|center]]8b. Use a crowbar again to remove the parts from the machine frame.[[File:Imprinter_machineframe1.png|alt=Imprinter machineframe1|center]]8c. Remove the Circuit Imprinter machine board from the stack of items. Click on the machine frame while holding the hyper convection Circuit Imprinter machine board. Shift click the machine frame and fill it with the rest of the materials that it requires. (You should have all the materials if the previous steps were followed).[[File:Machine_frame_p3.png|center]]8d. Screwdriver the machine frame to finish the construction. (If this does not work you are missing materials).
# Repeat step 8 through 8d with the Protolathe and Autolathe machines.
# Repeat step 8 through 8d with the Protolathe and Autolathe machines.
# Congratulations! You have built a hyper convection machines and a safe setup! Good work fellow scientist!
# Congratulations! You have built a hyper convection machines and a safe setup! Good work fellow scientist!
Revision as of 08:34, 24 August 2024
Uh oh, this page is still under research!
Due to the nature of science, this page can be out of date or lacking information. This page will be updated as soon as we can. We thank you for your patience crewmate!
Research and Development (commonly called R&D or RnD) is the job of the Scientists. The department typically lies behind purple and grey doors. In the department typically exists a set of Lathe and R&D machines. Often you will see lockers with lab equipment in them.
R&D gameplay largely revolves around the acquisition and use of research points to gain new technologies for the station.
Point Generation
Research points can be acquired through a few different sources.
The most profitable form of point generation is Xenoarcheology, which is the process of analyzing and activating different randomly generated artifacts that can be found via events, salvage debris, and by ordering them from cargo. Most artifacts have more than one "Stimulus-Reaction" combination (known scientifically as Nodes), so make sure to scan and activate as many of them as you can before selling it to cargo, or keeping it around because its effects are cool enough to warrant keeping.
Another highly valuable source of research points is Anomalous Research. Most R&D departments come equipped with an Anomaly Generator, Anomalous Particle Emitters (A.P.E.) and Anomaly Vessels, which are used to spawn, interact with, and generate points from anomalies respectively. Anomalies can come in different forms, ranging from raging balls of pink-hot matter, to electrically-discharging motes of light, to radioactive gravity wells, so make sure to wear some protective gear while studying them.
Points can also be acquired through research disks, which can be found in maintenance, salvaged from space, or found on expeditions.
R&D System
The user interface of the R&D Console
In the R&D computer new technologies can be unlocked via points. To research a technology, click on it if it's in the Unlockable technologies column. Technologies in the Future technologies are locked behind others, requiring you to research a previous technology (in the Unlockable technologies column). Technologies in the Unlocked technologies section have already been researched.
R&D Tree
The R&D tree is the main focus of the R&D system. The R&D Tree system is composed of four categories: Industrial, Arsenal, Experimental, and Civilian Services. When accessing the R&D console you will get a choice of one node of each of the four categories.
The nodes are sorted into multiple tiers.
Tier 1 has basic technologies.
Tier 2 has moderately advanced technologies.
Tier 3 has highly advanced technologies.
To advance from one tier to another you must purchase the majority of a single tier from a category before you can advance to the next. For example, buying the majority of the tier 1 Industrial category will advance you to the tier 2 industrial category.
You can research all nodes from each category until you research a tier 3 research from one category. Researching the tier 3 node from a category will lock you to that category as your "Main Discipline". It is possible to acquire multiple R&D servers but the game will only allow one Main Discipline per R&D server. Tier three research that is not your Main Discipline may also be acquired through gambling with the Technology Disk Terminal.
There is another method to research a technology, and that is using the Technology Disk Terminal. If there is no such console available within the station, it can be created after researching the Tier 1 Experimental Technology, "Alternative Research".
By spending 1000 research points, a technology disk would be dispensed, containing the recipe of a single random item (of any tier) for the lathes to fabricate. The random item ranges from a HAMTR Harness within the "Critter Mechs" technology, a redundant item you've already researched, to the highly-sought-after (and expensive) satchel of holding.
When used early into the round, it may reward the research department with end-tier items immediately at the cost of the primary research progress. This is essentially gambling with research points, so ensure that your department agrees with this plan. When used late into the round, it may grant the research department recipes of technologies that have been locked out of the direct research method of unlocking the technology.
The Protolathe is a machine capable of printing most of what you've researched. It can make things such from large beakers to microreactor batteries. Protolathes are mainly found at science but can (sometimes) be found in engineering or on salvage expeditions.
Industrial
Item
Crafting Cost
Research
Tier
Research Cost
High-capacity power cell
steel [3]+glass [4]+plastic [2]+gold bar [0.5]
Advanced Powercells
1
7,500
Mining drill
steel [5]+plastic [1]
Salvage Equipment
1
7,500
Grappling gun
steel [5]+glass [5]+gold bar [1]
Welding gas mask
steel [6]+glass [2]
Experimental welding tool
steel [8]+plasma [2]
Advanced Tools
2
10,000
Power drill
steel [6]+plastic [2]
Jaws of life
steel [10]+glass [5]+plasma [3]+gold bar [0.5]
Ore bag of holding
steel [20]+silver bar [7.5]+plasma [15]+uranium [1.5]
Mass Excavation
2
12,500
Diamond tipped mining drill
steel [6]+plastic [2]+silver bar [2]+refined diamond [1]
Handheld mass scanner
steel [8]+glass [3]
Space Scanning
2
7,500
Holofan projector
steel [3]+glass [0.5]+plastic [0.5]
Advanced Atmospherics
2
7,500
Bag of holding
steel [20]+silver bar [7.5]+plasma [15]+uranium [1.5]
The Exosuit Fabricator is a machine that is capable of crafting a large variety of Cyborg and Mech parts. The Exosuit Fabricator is a material hungry machine and can use gold, silver, steel, plastic, glass, and plasma. The Exosuit Fabricator is a vital part of Cyborg creation and many of the advanced pieces are stuck behind research.
Industrial
Item
Crafting Cost
Research
Tier
Research Cost
Ripley harness
steel [15]+glass [12]
Ripley APLU
1
7,500
Ripley left arm
steel [10]+glass [7.5]
Ripley right arm
Ripley left leg
Ripley right leg
Hydraulic clamp
steel [5]+plastic [2]
Mining cyborg module
steel [5]+glass [5]+plastic [2.5]+gold [0.5]
Salvage Equipment
1
7,500
unknown item 'grappling gun cyborg module'
steel [2.5]+glass [2.5]+plastic [2.5]
unknown item 'GPS cyborg module'
steel [2.5]+glass [2.5]+plastic [2.5]
Space Scanning
2
7,500
Advanced tool cyborg module
steel [5]+glass [5]+plastic [2.5]+gold [0.5]
Advanced Tools
2
10,000
unknown item 'RCD cyborg module'
Arsenal (None)
Experimental
Item
Crafting Cost
Research
Tier
Research Cost
Anomaly cyborg module
steel [2.5]+glass [2.5]+plastic [2.5]
Basic Anomalous Research
1
5,000
Artifact cyborg module
steel [2.5]+glass [2.5]+plastic [2.5]
Basic XenoArcheology
1
5,000
Proximity sensor
steel [2.5]+glass [3]
Basic Robotics
1
5,000
Civilian Services
Item
Crafting Cost
Research
Tier
Research Cost
Gardening cyborg module
steel [2.5]+glass [2.5]+plastic [2.5]
Basic Hydroponics
1
5,000
Harvesting cyborg module
unknown item 'light replacer cyborg module'
steel [2.5]+glass [2.5]+plastic [2.5]
Robotic Cleanliness
1
5,000
Advanced cleaning cyborg module
steel [2.5]+glass [2.5]+plastic [2.5]+gold [0.5]
Advanced Entertainment
1
7,500
Musique cyborg module
steel [2.5]+glass [2.5]+plastic [2.5]
Clowning cyborg module
unknown item 'advanced treatment cyborg module'
steel [2.5]+glass [2.5]+plastic [2.5]+gold [0.5]
Mechanized Treatment
2
5,000
unknown item 'defibrillator cyborg module'
steel [5]+glass [5]+plastic [2.5]+gold [0.5]
H.O.N.K. harness
steel [30]+glass [12]+bananium [3.33]
H.O.N.K. Mech
2
7,500
H.O.N.K. left arm
H.O.N.K. right arm
H.O.N.K. right armX
H.O.N.K. right leg
Mech horn
steel [5]+bananium [1.33]
Security Techfab
Set deep within the security department sits the Security Techfab. The Security Techfab can use steel, plastic, glass, silver, gold, uranium, and plasma. Providing the Security Techfab with materials will allow you to produces, ammo, grenades, guns, and laser weapons. Given some research this machine can turn your armory into an arsenal of the most dangerous weapons you can get a hold of.
Anchored into the back of medical sits the Medical Techfab. The Medical Techfab can use steel, plastic, glass, cloth, plasma, and silver. A small amount of highly valuable items are acquired through the Medical Techfab through research.
Hyper convection machine are a highly valuable upgrade that is obtained from the Industrial Engineering research node. Hyper convection machines will craft items at a 50% discount from the original cost. The trade-off when it comes to these powerful machines is that they produce an immense amount of heat. The heat that is produced from these machines can quickly become lethal if sufficient preparations are not made. One of the ways to make a safe enclosure for hyper convection machines is:
Un-wrench the machines and move the protolathe, autolathe, and circuit imprinter to the back wall. If there is a R&D computer, move it out of the way.
Build a 2x3 box of directional reinforced windows. At the middle-right side of the box create a windoor.
Create an air alarm and a air sensor. Place the air sensor within the box at the center right, and the air alarm nearby for convenience.
Create one (required) or two (optional) space heater(s) at the top-right and bottom-right of the box.4a. Set the space heaters to have High energy consumption and make sure that they are On.
Either hack the air alarm or ask an engineer to help you with networking. To hack the air alarm we must first use a screwdriver on it to open the panel. When the panel is open use a wirecutter tool on the air alarm itself. The lights above refer to the wires below. The wire that we are looking to cut is the ACC wire. The ACC wire is what controls who is authorized to network and control the Air Alarm.5a. Cut the wires from left to right (by clicking on them with a wirecutter in hand) until you get the ACC light to turn off. You may get unlucky like I did and hit a power wire before the ACC wire, you will get shocked because of this. Skip the power wire and continue until you reach the ACC wire. Once you have found the ACC wire repair all other wires (by clicking on them with a wirecutter in hand) and leave the ACC wire cut. Close the panel on the air alarm with the screwdriver.
Use a multitool or a network configurator and click on the air sensor first, followed by the air alarm.6a. Click Add on the air alarm GUI and then close the GUI.
In a similar process, use a multitool or a network configurator and click on the windoor first, followed by the air alarm. 7a. Click the Danger button and then click Close. Click on the Warning button and click Close. Finally, click the Normal button and then click Open. Then click the Done button.
Create the hyper convection circuit imprinter machine board at the Circuit Imprinter. Create or gather 1 matter bin and 1 igniter. Use a screwdriver to open the panel on the Circuit Imprinter.8a. Use a crowbar to deconstruct the imprinter into a machine frame.8b. Use a crowbar again to remove the parts from the machine frame.8c. Remove the Circuit Imprinter machine board from the stack of items. Click on the machine frame while holding the hyper convection Circuit Imprinter machine board. Shift click the machine frame and fill it with the rest of the materials that it requires. (You should have all the materials if the previous steps were followed).8d. Screwdriver the machine frame to finish the construction. (If this does not work you are missing materials).
Repeat step 8 through 8d with the Protolathe and Autolathe machines.
Congratulations! You have built a hyper convection machines and a safe setup! Good work fellow scientist!
Troubleshooting
"I can't get any points/I can't print anything"
The likely cause is that the Lathe/Imprinter/Computer isn't synced up with the RD server.
To fix this in the Lathe/Imprinter/Computer click Server list, click on ID x || RDSERVER and then exit the window.


 S.U.P.E.R.P.A.C.M.A.N.-type portable generator machine board
 Power monitoring computer board
 Hyper convection autolathe machine board
 Hyper convection protolathe machine board


 Grappling gun
 Mining cyborg module
 Industrial ore processor machine board
 Welding gas mask
 Turbo recharger machine board
 Ripley left arm
 Ripley right arm
 Ripley left leg
 Ripley right leg
 Ripley central control module
 Ripley peripherals control module
 Hydraulic clamp
 Holofan projector
 Power drill
 Jaws of life
 Advanced tool cyborg module

 Handheld mass scanner
 Satchel of holding
 Duffelbag of holding


 protolathe,
  autolathe, and
  circuit imprinter to the back wall. If there is a
  R&D computer, move it out of the way.
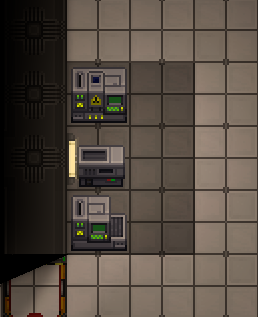
 directional reinforced windows. At the middle-right side of the box create a
  windoor.
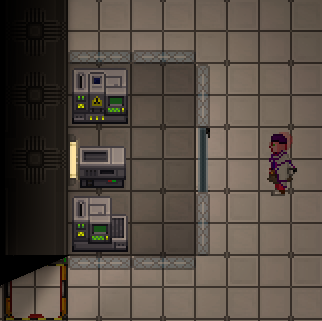
 space heater(s) at the top-right and bottom-right of the box.
 screwdriver on it to open the panel. When the panel is open use a
  wirecutter tool on the air alarm itself. The lights above refer to the wires below. The wire that we are looking to cut is the ACC wire. The ACC wire is what controls who is authorized to network and control the Air Alarm.
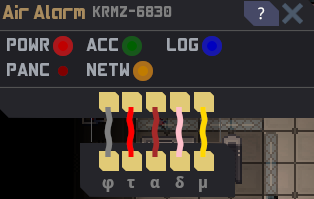
 multitool or a
  network configurator and click on the air sensor first, followed by the air alarm.