Nuclear Operative Station Guide: Difference between revisions
No edit summary |
m i changed a lot. WIP on nukie strats and gear recommendations |
||
| (26 intermediate revisions by 4 users not shown) | |||
| Line 1: | Line 1: | ||
== | ==Overview== | ||
This will be an all encompassing guide for [[Nuclear Operative]] | This will be an all encompassing more in depth guide for [[Nuclear Operative|Nuclear Operatives]], exploring possible options in order to deliver the payload and complete your objective. Bear in mind, being a nukie is not for the weak-hearted. It's highly recommended to familiarize yourself with the game's controls, departments, and flow. Gear up, don't split up, communicate, and obey your commander's orders. | ||
all | ==Create a plan== | ||
Planning is most often what slows you down. There are many different factors at play, such as the station map, the agility and combat prowess of your fellow operatives, and the ability to heal from your Agent. In general, nukie approaches fall under two umbrellas: War-Ops, or Stealth-Ops. | |||
War-Ops is the use of the "war declarator" remote in the possession of the Commander to send any message, which can be seen by the entire server. Whether your team decides to declare war is ultimately decided by the Commander, but a good leader will take input from their subordinates. '''War cannot be declared after a certain period, and Nukies may not leave their home planet until 15 minutes have passed from the time of declaration.''' The main appeal of declaring war is that all operatives recieve 80TC, rather than your usual 40, significantly widening your options for gear. You may choose to invest in an otherwise unaffordable reinforcement, or alternative implants like the Macrobomb Implant. After declaring war, the station will be fully aware of your existence and will undoubtedly begin arming and reinforcing for your arrival. Move quickly before they turn the scales towards themselves. | |||
Stealth-Ops is the "normal" gameplay for nukies. Each operative, including Commander, has 40 TC to work with. However, you have the advantage of surprise over the station, who won't see you coming until it's too late. Use this stealth to your advantage, strike hard and fast into whatever critical point you pick. | |||
It might be difficult to think up a plan on the fly, so here are some commonly seen or used options that can spice up a game: | |||
- '''Blitz-Ops :''' A popular choice for robust teams. The "Blitz" is derived from blitzkrieg, a strategy that uses overwhelming speed to overpower your opponents. This requires you to know what you're doing, agree to the plan, and gear up in minutes, before arriving and attacking the station as fast as possible. Often, the Agent does not need to make chems, and a Syndicate Medical Bundle is used instead. | |||
- '''Zed-Ops :''' Can be utilized both on War-Ops and Stealth-Ops. A Zombie bundle is purchased for 40TC, which contains one syringe of Romerol, one Ambuzol+ pill, and two Ambuzol pills. It's up to you how to deliver this potentially devastating disease, whether through stealthily injecting or through a Romerol foam grenade. ''WARNING: Zed-Ops is infamous for failing/backfiring.'' Make sure you have a competent Agent, or simply sacrifice yourselves so the rest can succeed. | |||
- '''Crate/Plushie-Ops:''' A silly yet deadly way to get close to the Captain, with the element of surprise as your strongest weapon. One operative disguises themselves as a Passenger or Clown(this is best done with chameleon gear or the Clown Bundle, found in your uplinks). Everyone else is put into a crate, which is welded shut. Once the disguised operative lures the captain into being alone, the crate is opened, and a defenseless captain is ambushed and killed before they can call for help. An alternative is Plushie-Ops, where you lower the Captain's guard down more when the crate is opened to reveal several plushies, which are simply operatives using Chameleon Projectors. | |||
- '''Law-Ops:''' Tired of the slaughtering rampages? Go on a ''legal'' rampage instead! This is done by using the war declarator to declare your intent not to kill, but to sue the station. The reason? Maybe NT was found guilty of monopolizing phoron. Maybe you or your loved ones were victims of an NT cover-up. Get creative! ''WARNING: This works best on MRP, however, don't be afraid to try it!'' | |||
- '''NT-Ops''' | |||
- '''Plasma-Ops''' | |||
- '''Tider-Ops''' | |||
- '''(X) Suit-Ops''' | |||
- | |||
==Gear up== | ==Gear up== | ||
==FTL and station approach== | ==FTL and station approach== | ||
Once you are completely sure EVERY [[Nuclear Operative]] is on board, informed of the plan going forward and geared up as much as possible, begin your preflight checklist. | |||
- Ensure all [[Nuclear Operative]]s are outfitted with a jetpack up to six of which spawn within the armory of the nuclear outpost. Note that the Agent will spawn with Bloodred Magboots, which come with a jetpack function. | |||
- Ensure all [[Nuclear Operative]]s have internals equipped with a backup if need be. | |||
- Ensure that the ships IFF and show vessel options are turned off on the IFF console in order to avoid early detection by station crew. | |||
- Reiterate the plan the all [[Nuclear Operative]]s ensuring everyone is aware and no one is SSD(AFK). | |||
- Call out the nuclear code and dispose of the paper. | |||
Now that the preflight checklist has been completed FTL and station approach may begin | |||
Firstly, undock from the syndicate outpost before flying out in the direction of the station this can be done by using the ship console, under the MAP tab, to scan for nearby objects. once sufficient distance away from the outpost has been made begin FTL ensuring that the FTL entrance point is away from the trade station, salvage ship or mining ship that may be able to spot you and warn of your coming arrival (unless the planned upon strategy suggests otherwise i.e destroying ATS computers so that cargo cant buy guns). | |||
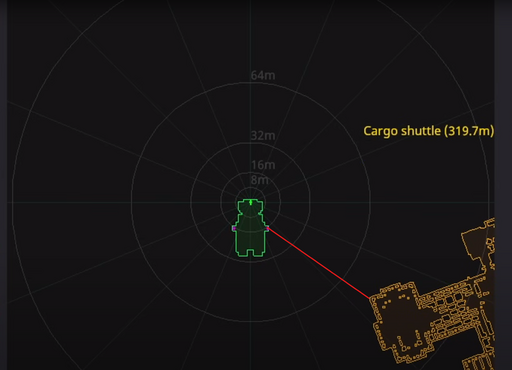
Secondly once you have arrived in space around the station move the ship to the desired entrance point ensuring that the ship is far enough away from the station so that any crew peaking through windows or engineers working on solars do not see you. You want to leave the ship a decent distance away from the station itself and approach on jetpacks. Once a location has been chosen line up either airlock of the ship to the desired entry point in a STRAIGHT LINE, so no one gets lost in space. (THIS IS CRUCIAL). | |||
DO | |||
[[File:Station approach do.png|512x512px]] | |||
DONT | |||
[[File:Station approach dont.png|512x512px]] | |||
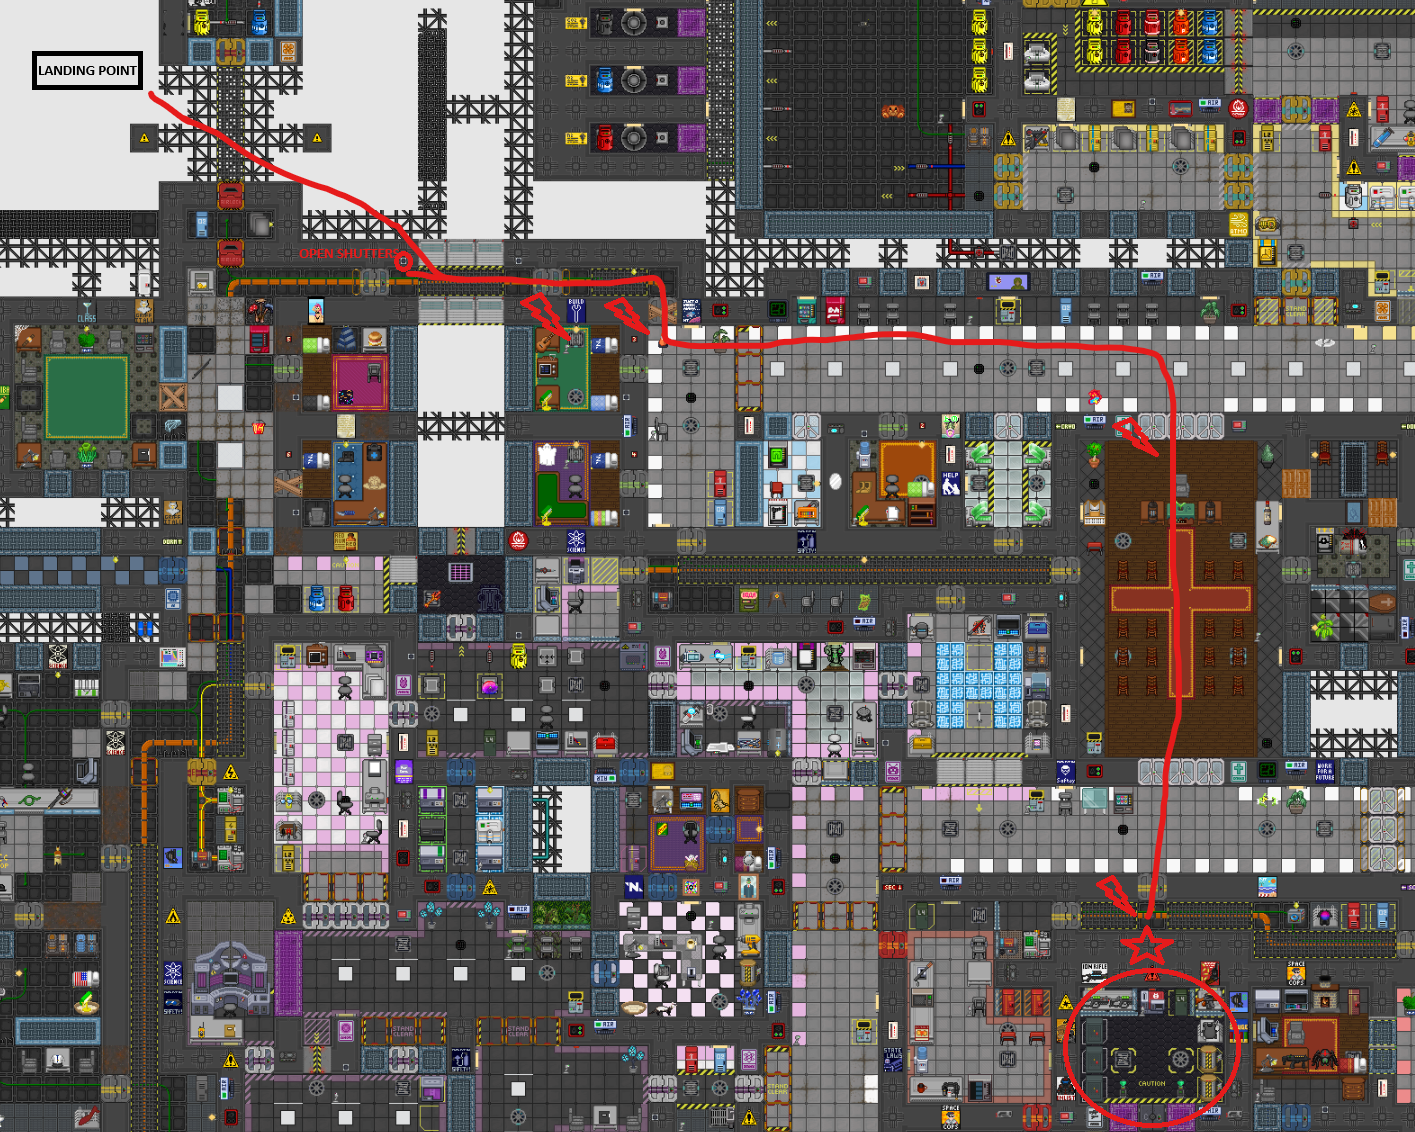
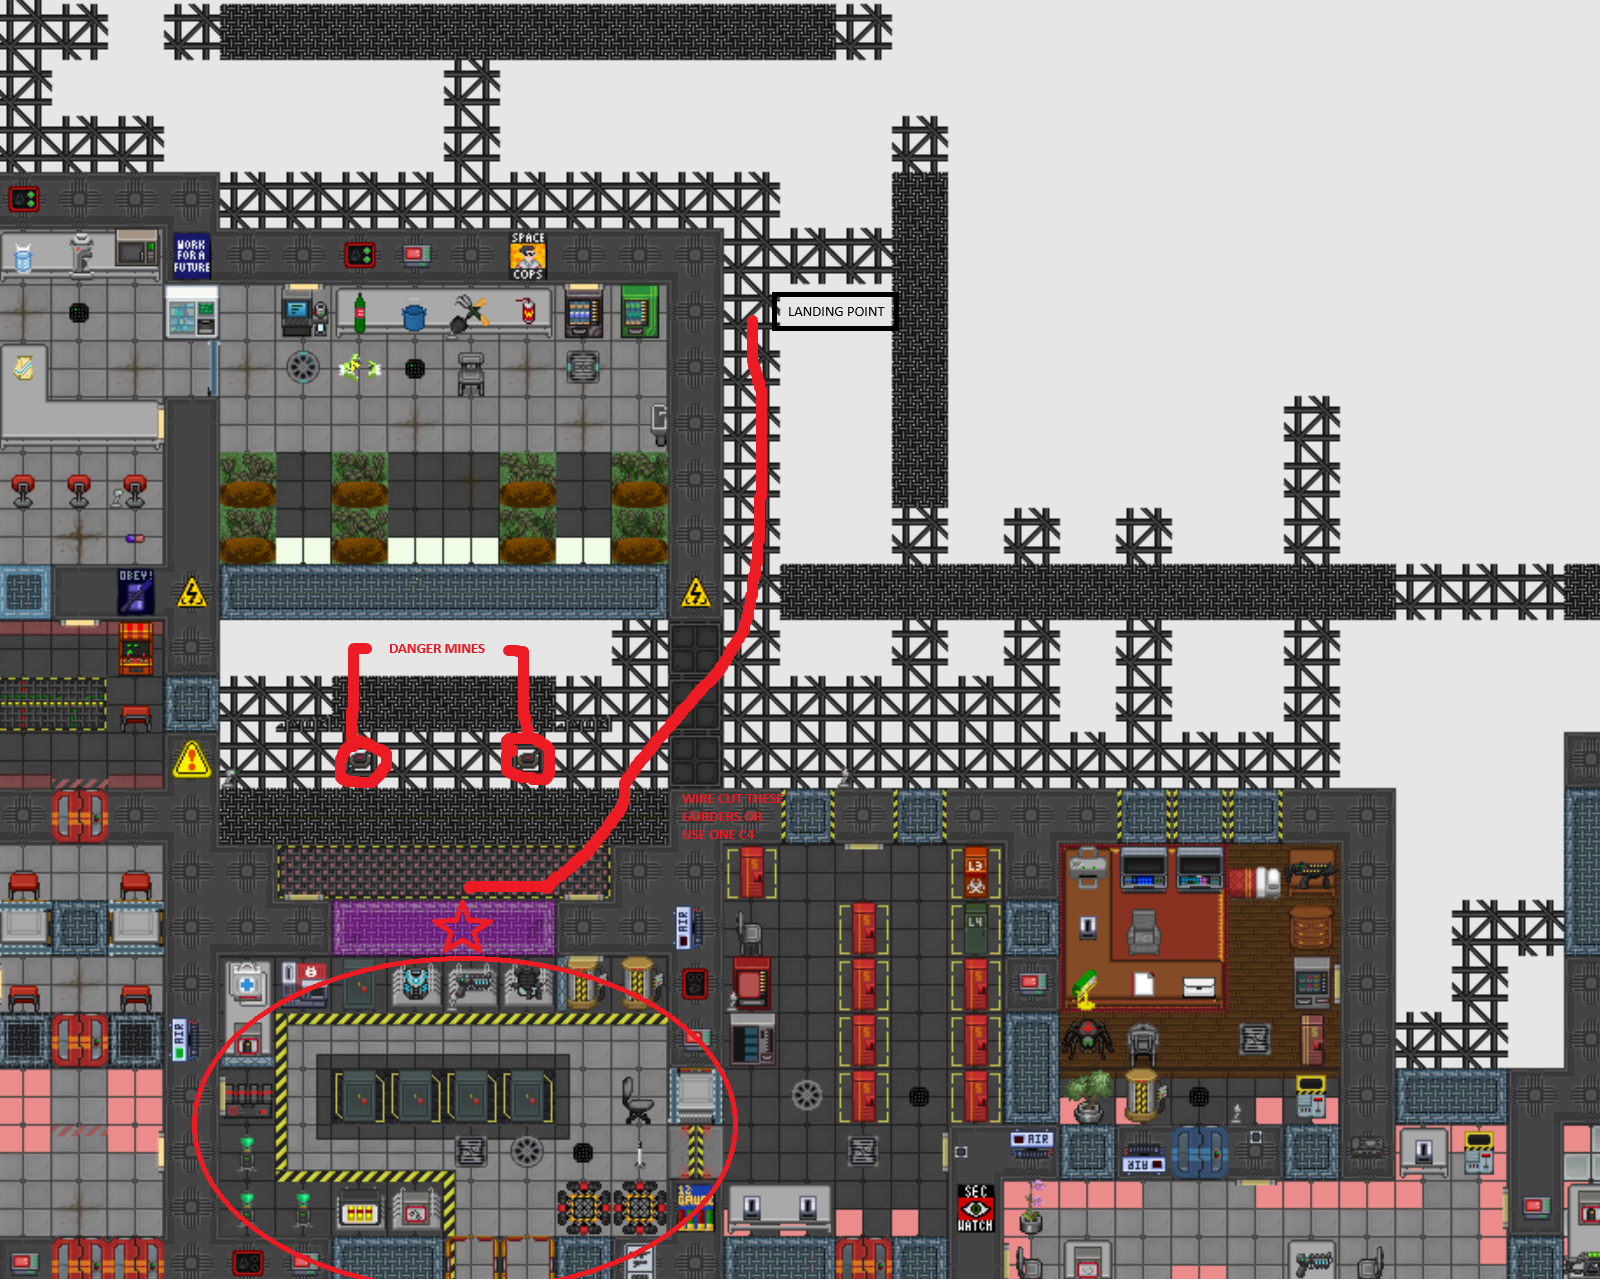
==station entrance armory rush== | |||
(note: when reading maps | |||
- the lighting bolt stands for emag and or open using jaws of life agnet id etc | |||
- the star stands for explode | |||
Bagle station | |||
[[File:Bagle armoury rush.png]] | |||
box station | |||
[[File:Box armoury rush.png]] | |||
Latest revision as of 07:00, 18 May 2025
Overview
This will be an all encompassing more in depth guide for Nuclear Operatives, exploring possible options in order to deliver the payload and complete your objective. Bear in mind, being a nukie is not for the weak-hearted. It's highly recommended to familiarize yourself with the game's controls, departments, and flow. Gear up, don't split up, communicate, and obey your commander's orders.
Create a plan
Planning is most often what slows you down. There are many different factors at play, such as the station map, the agility and combat prowess of your fellow operatives, and the ability to heal from your Agent. In general, nukie approaches fall under two umbrellas: War-Ops, or Stealth-Ops.
War-Ops is the use of the "war declarator" remote in the possession of the Commander to send any message, which can be seen by the entire server. Whether your team decides to declare war is ultimately decided by the Commander, but a good leader will take input from their subordinates. War cannot be declared after a certain period, and Nukies may not leave their home planet until 15 minutes have passed from the time of declaration. The main appeal of declaring war is that all operatives recieve 80TC, rather than your usual 40, significantly widening your options for gear. You may choose to invest in an otherwise unaffordable reinforcement, or alternative implants like the Macrobomb Implant. After declaring war, the station will be fully aware of your existence and will undoubtedly begin arming and reinforcing for your arrival. Move quickly before they turn the scales towards themselves.
Stealth-Ops is the "normal" gameplay for nukies. Each operative, including Commander, has 40 TC to work with. However, you have the advantage of surprise over the station, who won't see you coming until it's too late. Use this stealth to your advantage, strike hard and fast into whatever critical point you pick.
It might be difficult to think up a plan on the fly, so here are some commonly seen or used options that can spice up a game:
- Blitz-Ops : A popular choice for robust teams. The "Blitz" is derived from blitzkrieg, a strategy that uses overwhelming speed to overpower your opponents. This requires you to know what you're doing, agree to the plan, and gear up in minutes, before arriving and attacking the station as fast as possible. Often, the Agent does not need to make chems, and a Syndicate Medical Bundle is used instead.
- Zed-Ops : Can be utilized both on War-Ops and Stealth-Ops. A Zombie bundle is purchased for 40TC, which contains one syringe of Romerol, one Ambuzol+ pill, and two Ambuzol pills. It's up to you how to deliver this potentially devastating disease, whether through stealthily injecting or through a Romerol foam grenade. WARNING: Zed-Ops is infamous for failing/backfiring. Make sure you have a competent Agent, or simply sacrifice yourselves so the rest can succeed.
- Crate/Plushie-Ops: A silly yet deadly way to get close to the Captain, with the element of surprise as your strongest weapon. One operative disguises themselves as a Passenger or Clown(this is best done with chameleon gear or the Clown Bundle, found in your uplinks). Everyone else is put into a crate, which is welded shut. Once the disguised operative lures the captain into being alone, the crate is opened, and a defenseless captain is ambushed and killed before they can call for help. An alternative is Plushie-Ops, where you lower the Captain's guard down more when the crate is opened to reveal several plushies, which are simply operatives using Chameleon Projectors.
- Law-Ops: Tired of the slaughtering rampages? Go on a legal rampage instead! This is done by using the war declarator to declare your intent not to kill, but to sue the station. The reason? Maybe NT was found guilty of monopolizing phoron. Maybe you or your loved ones were victims of an NT cover-up. Get creative! WARNING: This works best on MRP, however, don't be afraid to try it!
- NT-Ops
- Plasma-Ops
- Tider-Ops
- (X) Suit-Ops
-
Gear up
FTL and station approach
Once you are completely sure EVERY Nuclear Operative is on board, informed of the plan going forward and geared up as much as possible, begin your preflight checklist.
- Ensure all Nuclear Operatives are outfitted with a jetpack up to six of which spawn within the armory of the nuclear outpost. Note that the Agent will spawn with Bloodred Magboots, which come with a jetpack function.
- Ensure all Nuclear Operatives have internals equipped with a backup if need be.
- Ensure that the ships IFF and show vessel options are turned off on the IFF console in order to avoid early detection by station crew.
- Reiterate the plan the all Nuclear Operatives ensuring everyone is aware and no one is SSD(AFK).
- Call out the nuclear code and dispose of the paper.
Now that the preflight checklist has been completed FTL and station approach may begin
Firstly, undock from the syndicate outpost before flying out in the direction of the station this can be done by using the ship console, under the MAP tab, to scan for nearby objects. once sufficient distance away from the outpost has been made begin FTL ensuring that the FTL entrance point is away from the trade station, salvage ship or mining ship that may be able to spot you and warn of your coming arrival (unless the planned upon strategy suggests otherwise i.e destroying ATS computers so that cargo cant buy guns).
Secondly once you have arrived in space around the station move the ship to the desired entrance point ensuring that the ship is far enough away from the station so that any crew peaking through windows or engineers working on solars do not see you. You want to leave the ship a decent distance away from the station itself and approach on jetpacks. Once a location has been chosen line up either airlock of the ship to the desired entry point in a STRAIGHT LINE, so no one gets lost in space. (THIS IS CRUCIAL).
station entrance armory rush
(note: when reading maps - the lighting bolt stands for emag and or open using jaws of life agnet id etc - the star stands for explode
Bagle station


