Salvage Specialist
Cargo Department
Salvage Specialist
- Access: Salvage, Cargo, External, Maintenance
- Difficulty: Medium
- Duties: Retrieve materials from wrecks, kick ass, score some sick loot, and TURN ON YOUR SUIT COORDINATES!
- Supervisors: Quartermaster
- Subordinates: None
- Guides: This is the guide! See also: Space Navigation, Shuttle Construction
As a Salvage Specialist, you act as one of the crucial links in the station's supply chain. Use the Salvage Magnet to pull in debris and asteroids, strip them for loot and ore, and return to the station. Be sure to bring a GPS and memorize station coordinates so that you do not get lost in space.
The Salvage Bay
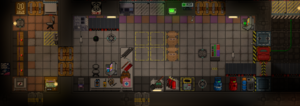
At the start of the round, you will spawn in the Salvage Bay, a subsector of Cargo accessible only to Salvage and the Quartermaster. The Salvage Bay will often consist of a small locker room attached to a larger chamber filled with the machinery necessary to preform your job.
This is where you'll pull in new debris, process ore and scrap into valuable materials, refill your air supply, and store any extra loot or equipment that the QM lets you hold on to. Acquaint yourself with the layout of your workspace, and take note of what's available to you.
Salvage Equipment
Salvaging is a dangerous job, and inexperienced Salvage Specialists often end up lost in space or dead on debris with no way for the station to rescue them. At the start of the shift, a variety of vital equipment will be available to you in the Salvage Bay. You should, at minimum, always take a Spationaut Hardsuit, Oxygen/Nitrogen Tank, and GPS before departing.
Types of Salvage
Salvage Magnet Pulls
The Salvage Magnet gives the user a choice between five different pieces of salvage, split between three categories; Debris, Asteroids, and Salvage Wrecks. Offers will cycle every three minutes. Once a piece of salvage has been pulled in, it will generally spawn in space 50-100 meters off in the direction the magnet is facing, where it will remain for six minutes before disappearing. Debris and Asteroids will have gravity, while Salvage Wrecks will not. Any items or structures onboard a piece of salvage when it disappears will disappear along with it.

Before pulling something in with the Salvage Magnet, you should always confer with your fellow Specialists and consider asking the Quartermaster for any input. Don't be that guy that pulls in a salvage wreck when engineering is begging for steel to rebuild the station.
Debris
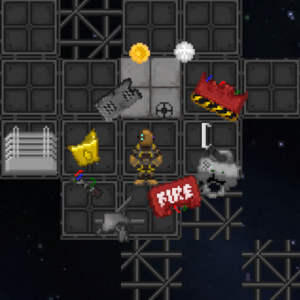
The most straightforward form of salvage, debris consists of a few pieces of randomly generated wrecked flooring sprinkled with walls, airlocks, equipment, lockers, and racks. The two main draws of debris are Loot, which can be found scattered around the floor and within lockers, and Scrap, various pieces of Debris-only garbage which can be recycled for large amounts of basic materials. To maximize your haul, unwrench one of the many lockers onboard and drag it along with you, filling it with any scrap or interesting loot you can find. Make sure you get your loot off the Debris before it despawns!
Debris will almost always contain some number of Space Carp, and rarely host the more dangerous Sharkminnow. They can be dealt with rather easily with your PKA, as long as you keep out of their range or shoot them from the safety of space. Remember to butcher them with your knife afterwards for Carp Fillet and Teeth.
Asteroids
When pulling in Asteroids, Specialists can easily read their contents on the Salvage Magnet. Generally speaking, asteroids containing rarer materials like Gold, Silver, and especially Uranium should be prioritized over those containing Coal, Iron, or Quartz. Basic materials can be acquired from scrap on debris, or purchased by cargo if necessary; rare metals are not so easily acquired.
Once an asteroid has been pulled, be sure to equip an Ore Bag for easy storage and grab a pickaxe before heading out into the void. Asteroids are far safer than other forms of salvage and lack enemies, so mining should be relatively straightforward. Be sure to dump your haul into the Ore Processor once you get back, and inform cargo so they can take advantage of the materials.
Salvage Wrecks
By far the most dangerous and diverse option on the Salvage Magnet, Salvage wrecks come in three sizes (Small, Medium, and Large) and consist of a number of premade wrecks for you and your crew to explore and loot. Salvage wrecks feature a much wider variety of loot, as they can feature equipment and structures from any department. They also feature a wide variety of threats, including space bears, invisible space snakes, venomous space spiders, angry space kangaroos, and other dangers.
Salvage wrecks generally lack ore and materials, and are far more of a gamble than other magnet options. Some wrecks feature nearly nothing of value to the station; others may include power generators, alien artifacts, deadly weaponry, or rare equipment. Always be willing to think outside the box when looting a Salvage Wreck, and keep an Appraisal Tool handy to decide whether something is worth grabbing or not.
Round-start Wrecks
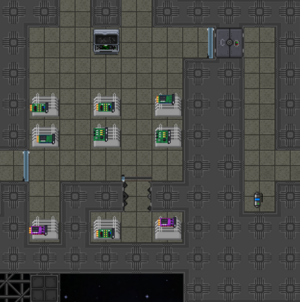
At the beginning of the shift, a variety of wreckage has a chance to naturally spawn in the space surrounding the station. These wrecks are very similar to Salvage Wrecks, often featuring valuable loot with the potential for deadly enemies on board. Round-start wrecks will not despawn, meaning they can generally be explored at your leisure.
The VGRoid
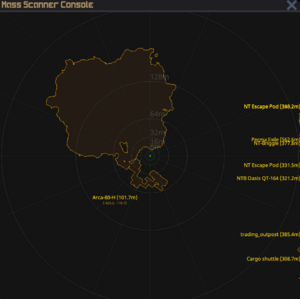
Often spawning hundreds of meters away from the main station, the VGroid or Big Asteroid is a massive asteroid full of rare minerals and scattered with abandoned research facilities. Reaching the VGRoid generally requires a shuttle or jetpacks, and should generally not be explored alone due to the exceptional dangers within.
The asteroid itself is full of rare minerals that can be found in huge veins, allowing for salvage to easily acquire enough materials to supply the entire station. However, many of the caves within the asteroid contain deadly enemies, such as Goliaths and Xenos, making mining hazardous to the unprepared. Some of these caves also contain small vaults which house valuable loot.
The facilities built into the asteroid are massive, and contain large amounts of rare loot in addition to basic materials and contraband. They are similarly dangerous however, often containing Goliaths and Hivelords. Always be sure to explore them with a clear route of escape available.
Salvage Expeditions
Serving as one of the most advanced forms of Salvage, Expeditions are dangerous missions which require the use of a shuttle to bring a salvage team to a nearby planet, where mineral riches and forgotten treasure await. In order to begin an expedition, A Salvage Expeditions Computer must be used to select one of three available missions. Missions will list their general difficulty, the type of monster to be encountered on the planet, the planet's biome, and the various environmental factors on the planet such as air quality, temperature, and time of day.
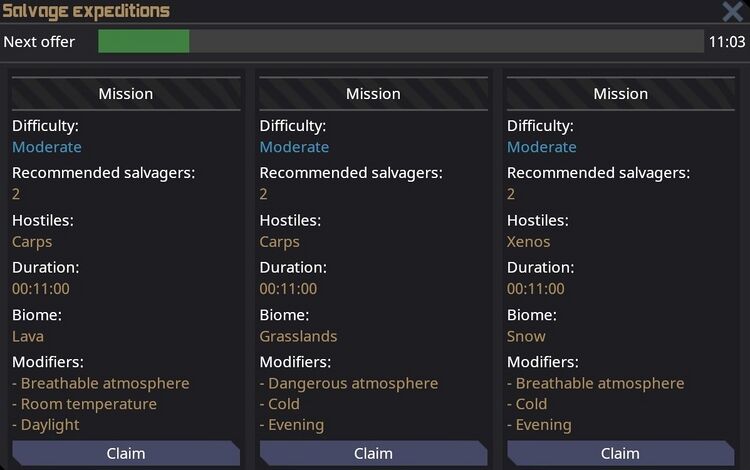
Difficulty, Duration & Recommended Salvagers: Expeditions, as currently implemented, will always have Moderate difficulty, a Duration of 11 minutes, and the Recommended number of Salvagers will always be 2. In general, consider the other factors in the expedition to get an idea of it's difficulty, and bring the entirety of Salvage along on the Expedition.
Hostiles: Expeditions will either be listed as having Carp, which means they'll feature regular Space Carp and rarely a toned-down version of the Space Dragon, or they'll be listed as having Xenos, which means they'll have a much wider variety of Xeno enemies. Carp expeditions will be the far safer option, as Space Carp have simple AI and die very quickly, whereas Xenos are more intelligent, capable of prying open doors or vaulting over obstacles, and generally deal more damage and tank more hits. See the (Pending) Threats section for more details on enemy types.
Biome: The most important factor to consider when choosing your expedition. Biomes will generally determine both the type of dungeon you'll encounter as well as the density of ore available, though neither of these factors is stated up front.
- Snow biomes are generally preferable, featuring huge ore deposits and large facilities to explore with solid loot inside. Beware of plasma pools, which will immediately light you on fire on contact.
- Grassland biomes are also decent, usually featuring smaller facilities and less ore, though they are certainly pretty to look at (And give you the unique bragging right of having touched grass!).
- Lava planets are another good choice, featuring large pools of deadly lava both inside and outside the facility, but also offering unique security dungeons and good ore deposits as well.
- Caves are usually the worst option, featuring small, scattered rooms with decent loot, and scattered ore deposits. Beware of chasms, which will kill you instantly and permanently if touched.
Atmosphere, Temperature & Time of Day: A planet's atmosphere can either be Breathable, meaning that it'll have standard air levels breathable by most species (Vox not included), or Dangerous, meaning that the planet's air will be composed of Nitrous Oxide that will cause anyone without internals to fall asleep constantly. The temperature of a planet is mostly self explanatory: Hotter planets can cause you to overheat, colder planets can cause you to freeze. Wearing your hardsuit will protect you from either extreme of temperature. Time of day is similarly self explanatory, with visibility being the best on planets with Daylight and the worst for those at Night.
After selecting an expedition, all other options will become locked, and an expedition disc will print from the Expeditions Computer. Until this expedition is completed, no other expeditions can be undertaken. To begin the expedition, simply insert the disc into a Shuttle Console, open the FTL menu and pilot the shuttle within FTL range of the expedition's destination, and make the jump.
Your shuttle will land at Coordinates 0, 0 upon the new planet. You'll have 11 minutes to explore, mine, and loot, before the shuttle automatically departs from the planet. If there is a dungeon present on the planet, you will also receive a notification in the chat log telling you the direction it's in. Be sure to reorient your camera to the planet's compass by using Numpad 8. You'll receive chat updates on your remaining expedition time at the 5 minute, 2 minute, and 45 second mark, and special expedition music will begin playing at the 2 minute mark, further intensifying the race back to the shuttle. After the 11 minutes is up, the ship will make an automatic FTL jump back to the station, and the Expeditions computer will start a cooldown timer for the next Expedition.
Here are a few extra tips to consider when undertaking an Expedition:
- Always, always, always remember that you have a GPS in your Salvage PDA. When the 2 minute mark hits and the music starts playing, you should generally pull our your PDA and begin the trek back to coordinates 0, 0, which is where your shuttle will always be located.
- While on an Expedition planet, your headset radio will not work, as you're no longer within range of the station's Telecommunications Servers. Make sure that everyone brings along a Handheld Radio, which will automatically transmit any nearby speech to other active Handhelds when active. You'll have plenty of Handhelds for everyone in your Salvage Vendor and Lockers.
- Before you leave on an Expedition, make sure to bring spare supplies along to increase your chances of survival. Does everyone have a Handheld Radio? Spare ore bags and pickaxes? What about spare Oxygen or Nitrogen tanks? Did you grab medkits or other medicine? Having these items can save your life, so don't sleep on them.
- Expeditions that feature ore (Which is to say, all of them except Lava planets) have enough ore to last you an entire shift. Bring along multiple ore bags, and consider wrenching down an Ore Box on your shuttle as well. The classic 2-1 rule (2 Specialists loot the dungeon, while 1 mines for ore) is always a good baseline to follow. As always, prioritize things that Cargo can't order, such as Gold, Silver, and Uranium.
- Landing on expedition planets/FTLing back to the station can often cause bugs. When landing on a planet, be prepared for the possibility that your shuttle will land inside the dungeon, and be prepared to fight mobs. When FTLing back from a planet, the shuttle can rarely land inside of the station, in which case you should Admin Help for assistance.
- When looting dungeons, be sure to consider looting machines in addition to smaller items. RTGs are always useful to have, and most dungeons will feature engineering rooms with everything necessary to equip your shittle with infinte power (RTGs, SMES's, Substations, and APCs). Random shuttle parts, such as thrusters, gravity generators, and gyroscopes can spawn throughout dungeons, giving you a shot at upgrading your ship on the fly.
- Expeditions are currently the only way for Cloning technology to be acquired in a regular round. However, getting cloning set up requires a Cloning Pod, Cloning Console Computer, and Medical Scanner, which can be found on Expeditions as either machine boards or completed machines. You'll also require Biomass cubes, which can be found on Expeditions, or created by grinding up bodies in a Biomass Generator, also found on Expeditions. Getting all of this technology together often requires multiple Expeditions, is extremely luck-based, and requires a significant amount of time. But the bragging rights are immense.
Threats
A variety of different creatures will be encountered by Specialists, whether they're found on Debris, Wrecks, the VGRoid, or Expeditions. Learn what you'll need to face out in the void, and you might come back alive.
Space Critters
The threats that are most commonly found on Debris and Salvage Wrecks. Most of these enemies can be kited with relative ease by using obstacles or remaining in space and firing your Proto-Kinetic Accelerator.
Xenos
Found on Salvage Expeditions with Xenos threats. Hostile, tough, and smart enough to pry open doors, climb over railings, or attack at range. They can only be butchered using a Meat Spike, and only for acidic Xenos Meat.
Megafauna
The big bosses that a Specialist may end up fighting, these deadly creatures are found as rare elite enemies on Expeditions, or as more common beasts on the VGRoid.
Advanced Salvage Equipment
While it is possible to effectively gather resources and loot with your starting equipment, there are numerous pieces of equipment and machinery that can enhance a Specialist's effectiveness. This section includes gear that can be found on salvage, made by the station, or purchased by Cargo.
| Image | Name | Source | Description |
|---|---|---|---|
 |
Salvage | The namesake of the Crusher family of weapons, a series of prototype PKA armaments. Equip in both hands to replace the wide-swing with a forcefield projectile that doubles the damage of your next strike and provides healing on hit. Comes with a built-in flashlight. Too large to be stored in any bags or equipment slots. | |
 |
Salvage | The youngest child of the Crusher family, and the most underestimated. An improvement over the regular Survival Knife, this dagger offers increased damage, attack speed, automatic wideswing, and the flashlight included with the other Crushers, all in a pocket-portable package. | |
 |
Salvage | A slightly improved version of the regular Crusher. Hitting enemies affected by the forcefield projectile deals slightly more damage and heals the user for slightly more health. Comes with a built in flashlight. Too large to be stored in any bags or equipment slots. | |
  |
Salvage | A common find on Debris, these tanks can be stored and used while in the pocket and can store up to 2.5L of gas, which is half the capacity of a full-sized tank. Very useful when combined with Mini Jetpacks. | |
 |
Salvage | Attach to an unanchored container or structure to automatically transport it to the Fulton Beacon after a 45-second delay. Make sure to link them to an active Fulton Beacon before leaving the station. Fultons and Fulton Beacons can be found on debris, as can Fulton Blueprints, which can be inserted into an autolathe to print more Fultons and Fulton Beacons. | |
 |
Science/Salvage | A portable battery-operated Mass Scanner, capable of mapping your precise location in space. Can be manufactured by Science if they've unlocked the Tier 1 Industrial Tech - Space Scanning, and rarely appears on Debris. | |
 |
Science | An upgraded form of the regular ore processor that requires less ore to make finished materials. Can be manufactured by Science if they've unlocked the Tier 1 Industrial Tech - Salvage Equipment. It's often smart to save as much ore as possible until your Ore Processor is upgraded, as you'll get far more materials overall by printing with the Industrial Ore Processor. | |
    |
Cargo/Salvage | A Fire Extinguisher will only get you so far. Jetpacks provide excellent movement and control in space, and can be acquired through a variety of methods. Cargo can purchase regular blue Jetpacks in crates of two for 1000 spesos. These have large 5L tanks, but must be worn in the backpack slot or held in hand to be used. Mini Jetpacks are often preferred for Salvage. They can be purchased in crates of two for just 750 spesos, and can be equipped in the belt or tank slot, at the cost of a reduced 1.5L capacity tank.
Rarely, you may find Syndicate Jetpacks while out on Debris. These are functionally identical to regular Jetpacks, but their menacing black paint makes them highly illegal Syndicate contraband! On even rarer occasions, you may find a mythical Void Jetpack, which offers the 5L tank size of a full Jetpack while still fitting in the belt and tank slot like a Mini Jetpack. Be sure to fill your Jetpack of choice with gas before leaving the station, and remember that it can only be used in space. Jetpacks will automatically deactivate once the user steps onto any sort of flooring. | |
  |
Cargo | Canisters filled with a supercooled liquid version of Oxygen or Nitrogen. Cargo can purchase these for 2500 spesos a pop, and they serve as an extremely efficient form of air. Gas tanks filled with liquid gas can have their output pressure safely lowered from 21.3 to 5 while remaining breathable, effectively quadrupling the tank's capacity. Combine this with a Double Emergency Tank for a pocket-portable air supply that can last you a lifetime. | |
 |
Science/Salvage | A battery operated scanner that scans the nearby area for valuable ore. Must be activated and in your hand or pocket to work. Can be manufactured by Science if they've unlocked the Tier 1 Industrial Tech - Salvage Equipment, and rarely appears on Debris. | |
 |
Science/Salvage | An upgraded Mineral Scanner that has a larger range. Can be manufactured by Science if they've unlocked the Tier 2 Industrial Tech - Mass Excavation, and very rarely appears on Debris. | |
 |
Salvage | An upgrade to the standard Spationaut Hardsuit. It has better armor and brighter headlights, but it will slow you down even more than the standard Hardsuit. | |
 |
Science/Salvage | An upgraded version of the Pickaxe that fits in your pocket and mines ore quicker. Can be manufactured by Science if they've unlocked the Tier 1 Industrial Tech - Salvage Equipment, and rarely appears on Debris and Salvage Wrecks. | |
 |
Science | An upgraded version of the Mining Drill that fits in your pocket and mines exceptionally quickly. Can be manufactured by Science if they've unlocked the Tier 2 Industrial Tech - Mass Excavation. | |
 |
Salvage | An upgraded version of the standard Utility Belt that can hold almost any tool, weapon or piece of equipment a Specialist might have. Your drill, your PKA, your scanners - all of these and more fit in the Salvage Rig. Can be found rarely almost anywhere that isn't a Magnet-pulled asteroid. | |
 |
Salvage | Used to blow things up, or yourself if you aren't careful. Effectively a Salvage C4, Charges can be linked to remote detonators to automatically explode or set to blow on timers. They can destroy airlocks and reinforced windows in one blast. Can be toggled to auto-activate on placement. Seismic Charges can be found on debris, as can Seismic Charge Blueprints, which can be inserted into an autolathe to print more Seismic Charges. |
Salvage Contraband: A Disclaimer
Unlike every other job on the station (Aside from Security), Salvage Specialists will quite often come into contact with contraband while carrying out their regular duties. This contraband can be of varying degrees of severity, from relatively mundane Engineering Goggles to highly illegal Syndicate equipment.
Understand that, as a Salvage Specialist, you are still beholden to the rules of contraband, and Security is fully entitled to confiscate this contraband or arrest you if you refuse to surrender it. A Salvage PDA is not a get-out-of-jail-free card for carrying, using, or distributing illegal items.
That being said, it is generally accepted that contact with contraband is a regular part of being a Salvage Specialist, and the Head of Security or Captain will often be willing to write you up a permit if you explain why a certain piece of contraband is helpful in carrying out your job. Sometimes Security will even look the other way for minor or benign contraband, but you shouldn't expect this to be the default reaction.
If you do plan to keep or use contraband without getting a permit, you should generally try to keep it away from easy access to random members of the Crew. Stowing it in locked Salvage Lockers or keeping it in space are common approaches. Consider keeping your Quartermaster updated on any contraband you happen to come across, and remember that they are your superior and can issue you orders.
As offering a full table of Salvage contraband would ruin the fun of discovery (and would likely prove impossible), instead consider this table of different contraband types and the punishments associated with them when you're running your cost/benefit analysis on keeping a piece of contraband.
| Type | Description | Summary |
|---|---|---|
| This item is considered minor contraband.
You probably want to avoid visibly carrying this around without a good reason. |
The Captain or Head of Security can authorize individual use of minor contraband.
Any item that is restricted to a department other than Command or Security is minor contraband unless otherwise specified. Certain other items, such as makeshift weaponry, can also be marked as minor contraband. Possession/Use of Minor Contraband is considered a Minor Crime (Code 1-01), meaning that warnings should be issued to first time offenders, and repeat offenders can be jailed for up to 5 minutes. | |
| This item is considered major contraband.
You probably want to avoid visibly carrying this around without a good reason. |
The Captain can authorize individual use of major contraband.
Any item that is restricted to Command or Security is major contraband unless otherwise specified. Certain other items, such as weaponry, can also be marked as major contraband. Possession/Use of Major Contraband is considered a Moderate Crime (Code 2-01), meaning that the maximum sentence per crime is 5 minutes. Officers can choose to issue a warning instead at their discretion. | |
| This item is highly illegal Syndicate contraband!
You probably want to avoid visibly carrying this around without a good reason. |
Use of Syndicate contraband cannot be authorized, and it's use is only legal in emergencies, and only if it prevents death or gross bodily harm.
Any item marked as Syndicate contraband falls under this category. Possession/Use of Syndicate Contraband is considered a Major Crime (Code 3-01), meaning that the maximum sentence per crime is 10 minutes. |
Tips & Tricks
- Remember that one of the best parts of being a Salvage Specialist is being a morale booster and gift-giver. You should not be keeping all the cool stuff you find out on Salvage all to yourself. Cargo and the rest of the station will be much happier to help you out if you make a point of delivering fun or useful items to them between magnet pulls or Expeditions. Grab tools, clothes, spare weapons (within reason), bling, food, and let the rest of the station enjoy it!
- Throwing something in zero gravity will fling you in the opposite direction. This can save your life if you are stuck in space without a jetpack.
- You can find a spare small oxygen tank inside your survival box. This small tank fits in your pocket, leaving your hands free.
- Holding down Control, and Right-Clicking on a tile near you while pulling something lets you move it around while standing still. In zero-gravity, you can fling objects such as crates/gas tanks towards the station by timing your release with Q accurately. This is not hard to figure out but is tricky to pull off consistently.
- Know what Cargo and other departments currently need, and prioritize your loot accordingly. Machinery usually fetches a higher price than small items, the Science department loves alien artifacts, and raw materials are always in demand. If you're mining, try to prioritize the things that the station can't buy, like Gold, Silver, and Uranium.
- You can cram a lot more items in a crate than in your backpack.
- If you have time, you can use your survival knife to butcher the alien lifeforms you find on the wrecks. The Chef always appreciates when they're brought rare delicacies such as bear or carp meat. Keep in mind that you can butcher as many creatures as you have within range, so stack up a pile of bodies and cut them up all at once to save some time.


